Create your first GraphQL API using AWS AppSync

Avatar img
Alex Suquillo
Software Developer
agosto 17, 2020
Lectura de 2 minutos
Create your first GraphQL API using AWS AppSync

We have a lot to share about this topic. So if you want to learn, read carefully.

First, you want to know that the information will be divided in two parts:

In this article, we will address basic concepts of GraphQL. We will design a simple API from scratch, and we will deploy it using AWS AppSync and Serverless Framework.

In the second part, we will create a client-side application to consume the API. We will use Amplify+React JS framework, and we will fit our API with more features by using subscriptions for a case of real-time use.

What is GraphQL?

GraphQL is a data query language for APIs, the essential idea is to make the API available through a single endpoint, instead of accessing several endpoints, as it is currently done with REST.

Among the advantages of GraphQL we can list the following:

  • Customers can specify exactly the structure of the data that will be served.

  • Efficiency in data loading, improving bandwidth use.

  • Declarative and self-documenting style, thanks to its strongly typed schemas.

Schemas

Schemas determine APIs capacity and define three basic operations: query, mutation, subscription. It also includes entry parameters and possible responses.

Resolvers

Resolvers implement APIs and describe the server's behavior. They are basically functions that are in charge of obtaining data for each field defined in the schema.

AWS Appsync + Serverless Framework

How to create a GrahpQL API using AWS

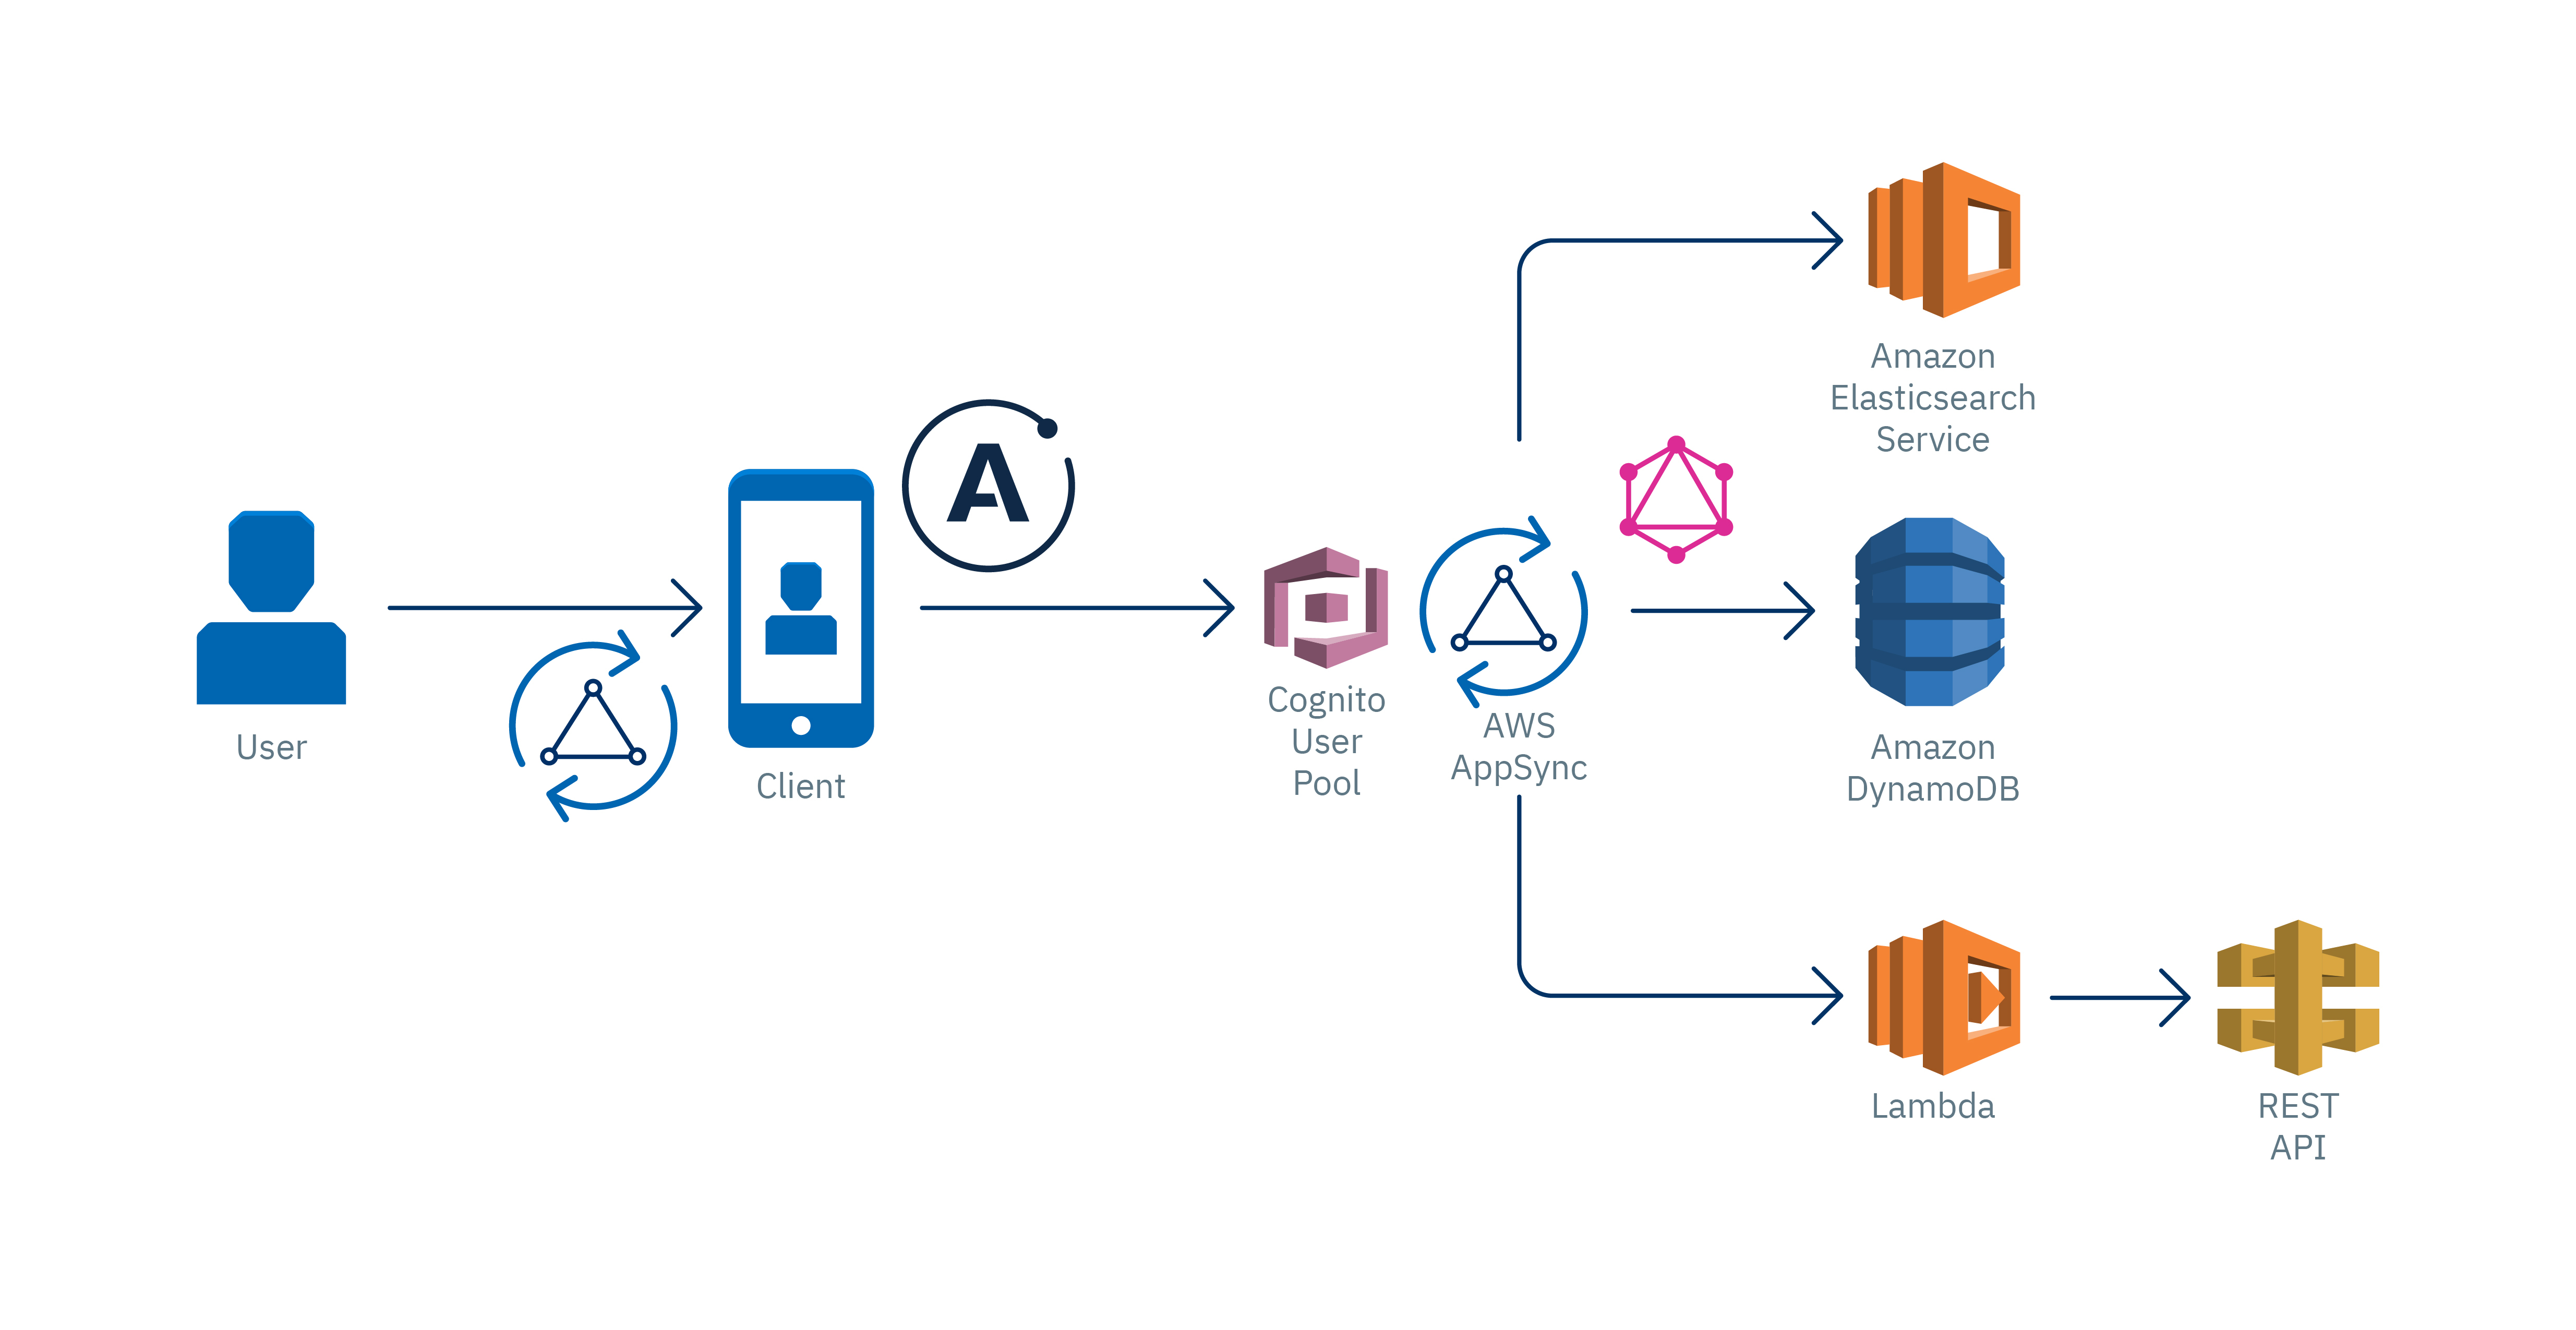
AppSync is a serverless service managed by AWS; it is GraphQL layer that will help us to develop our API smoothly. It is important to know AppSync basic components:

  • Schema: As we said before, it will help us to define basic types and operations to retrieve and save data.

  • Resolvers: They define query mapping templates and response templates for each field defined in the schema. They are written in VTL and are responsible for interpreting the responses from data sources; they also analyze queries.

  • Data sources: Integration with AWS services: DynamoDB, Lambda, RDS, and ElasticSearch.

  • Authentication: We can authenticate APIs by using API keys, IAM or Cognito User Pools

As we can see, AppSync provides some tools to build a GraphQL API smoothly. We just follow a series of steps in the AWS AppSync console and, in a few minutes, we will have a functional app. However, we prefer to do it in a way that keeps it closest to the reality of modern production applications.

Here's where Serverless Framework comes into play: A robust technology for defining infrastructure as code focused in serverless applications for different cloud providers. At Kushki, we believe that, nowadays, having a versioned and automated serverless infrastructure is crucial. We will see that it is a practical and efficient way of implementing our API. Serverless features several options to deploy AppSync in the cloud.

Let's start to put into practice all these concepts by creating a simple application.

The application: To-do List

In this first part of the article, we will create a GraphQL API of a CRUD To-Do List. We will use DynamoDB for the database.

Requirements:

  • NodeJS

  • An account in AWS (set up credentials)

  • Serverless Framework

Let's start installing Serverless Framework and a plugin for Appsync:

npm install -g serverless serverless-appsync-plugin In the main directory of the project, we will execute the following command to create a template containing the configurations we need to create a serverless application in AWS.

serverless create --template aws-nodejs Note: Add serverless-appsync-plugin in the plugins section of the serverless.yml file:

First, we'll define part of our infrastructure. To do this, we will create an all table in DynamoDB, in serverless.yml. At this moment, we will not worry about multiple configurations, the following fragment of code will be enough:

yml resources: Resources: all: Type:"AWS::DynamoDB::Table" Properties: TableName: all AttributeDefinitions: - AttributeName: id AttributeType: S KeySchema: - AttributeName: id KeyType: id KeyType: HASH BillingMode: PAY_PER_REQUEST

Define a GraphQL Schema

In the root file, create a schema.graphql file. Here is where we will define our schema and data types. For the moment, we will define the query and mutation operations. GraphQL has its own syntax, called SDL, here you can learn more about this topic.

 query: Query  
 mutation: Mutation  
 }


type Query {  
 listToDos: [ToDo]  
 getToDoById(id: ID!): ToDo  
 }


type Mutation {  
 createToDo(input: CreateToDoInput!): ToDo  
 updateToDo(input: UpdateToDoInput!): ToDo  
 deleteToDo(id: ID!): Boolean  
 }


type ToDo {  
 id: ID!  
 name: String  
 title: String!  
 description: String  
 completed: Boolean!  
 }


input CreateToDoInput {  
 id: ID!  
 name: String!  
 title: String!  
 description: String!  
 completed: Boolean!  
 }


input UpdateToDoInput {  
 name: String!  
 title: String!  
 description: String!  
 completed: Boolean!  
 } ```


Remember that for each field you define, you need to implement a resolver. In this case, our resolvers are queries for DynamoDB, written in VTL. There are some utility functions that will make its implementation easier, for more information on resolver mapping templates, you may [check this link.](https://docs.aws.amazon.com/es_es/appsync/latest/devguide/resolver-mapping-template-reference-overview.html) 


### createToDo Resolver:


We will create a mapping-templates directory in the root file of the project where we are hosting **the query and response resolvers** for each field created in the schema.


**Request**: Create a createToDo-request.vtl file and insert the following code:


json { "version" : "2017-02-28", "operation" : "PutItem", "key" : { "id" : $util.dynamodb.toDynamoDBJson($context.arguments.input.id) }, "attributeValues" : { "name" : $util.dynamodb.toDynamoDBJson($context.arguments.input.name), "title" : $util.dynamodb.toDynamoDBJson($context.arguments.input.title), "description" : $util.dynamodb.toDynamoDBJson($context.arguments.input.description), "completed" : $util.dynamodb.toDynamoDBJson($context.arguments.input.completed) } }


Using the variable $context.argument we can have access to the entry parameters that we have defined in our schema.


**Response:** Create a createToDo-response.vtl file and insert the following code:


json $utils.toJson($context.result) Do not worry about how data are obtained from DynamoDB, AppSync performs the connection with data sources, returns data in the variables $context.result and $utils.toJson, and displays them in an readable format for GraphQL. If you want to process these data in the resolver, you can do it using VTL.


### updateToDo Resolver:


**Request:** Create an updateToDo-request.vtl file and insert the code below; in this case, we will use an UpdateItem operation of DynamoDB:


json { "version" : "2017-02-28", "operation" : "UpdateItem", "key" : { "id" : $util.dynamodb.toDynamoDBJson($context.arguments.input.id) }, "update" : { "expression" : "SET name = :name, title = :title, description = :description, completed = :completed", "expressionValues": { ":author" : $util.dynamodb.toDynamoDBJson($context.arguments.input.name), ":title" : $util.dynamodb.toDynamoDBJson($context.arguments.input.title), ":content" : $util.dynamodb.toDynamoDBJson($context.arguments.input.description), ":url" : $util.dynamodb.toDynamoDBJson($context.arguments.input.completed) } } }


**Response:** Create a createToDo-response.vtl file and insert the following code: json $utils.toJson($context.result)


### getToDoByID Resolver:


**Request:** Create a createToDoById-request.vtl file and insert the following code:


json { "version" : "2017-02-28", "operation" : "GetItem", "key" : { "id" : $util.dynamodb.toDynamoDBJson($context.args.id) } }


**Response:** Create a getToDoById-response.vtl file and insert the following code:


json $utils.toJson($context.result)


We will define our AppSync infrastructure and the servereless.yml file, where we will define the resolvers (mappingTemplates), schema (schema), data source, and authentication type (authenticationType). It should have the following structure:


```yml service:  
 name: appsync-todo-app-backend


plugins:  
 - serverless-appsync-plugin


custom:  
 appSync:  
 name: todo-app  
 authenticationType: API\_KEY  
 mappingTemplates:  
 - dataSource: all  
 type: Mutation  
 field: createToDo  
 request: "createToDo-request.vtl"  
 response: "createToDo-response.vtl"  
 - dataSource: all  
 type: Mutation  
 field: updateToDo  
 request: "updateToDo-request.vtl"  
 response: "updateToDo-response.vtl"  
 - dataSource: all  
 type: Query  
 field: getToDoById  
 request: "getToDoById-request.vtl"  
 response: "getToDoById-response.vtl"  
 schema: # defaults schema.graphql  
 dataSources:  
 - type: AMAZON\_DYNAMODB  
 name: all  
 description: 'All table'  
 config:  
 tableName: all


provider:  
 name: aws  
 runtime: nodejs12.x


resources:  
 Resources:  
 all:  
 Type: "AWS::DynamoDB::Table"  
 Properties:  
 TableName: all  
 AttributeDefinitions:  
 - AttributeName: id  
 AttributeType: S  
 KeySchema:  
 - AttributeName: id  
 KeyType: HASH  
 BillingMode: PAY\_PER\_REQUEST ```


Finally, we will execute the following command to deploy our API in the AWS cloud:


serverless deploy


Testing our GraphQL API:
------------------------


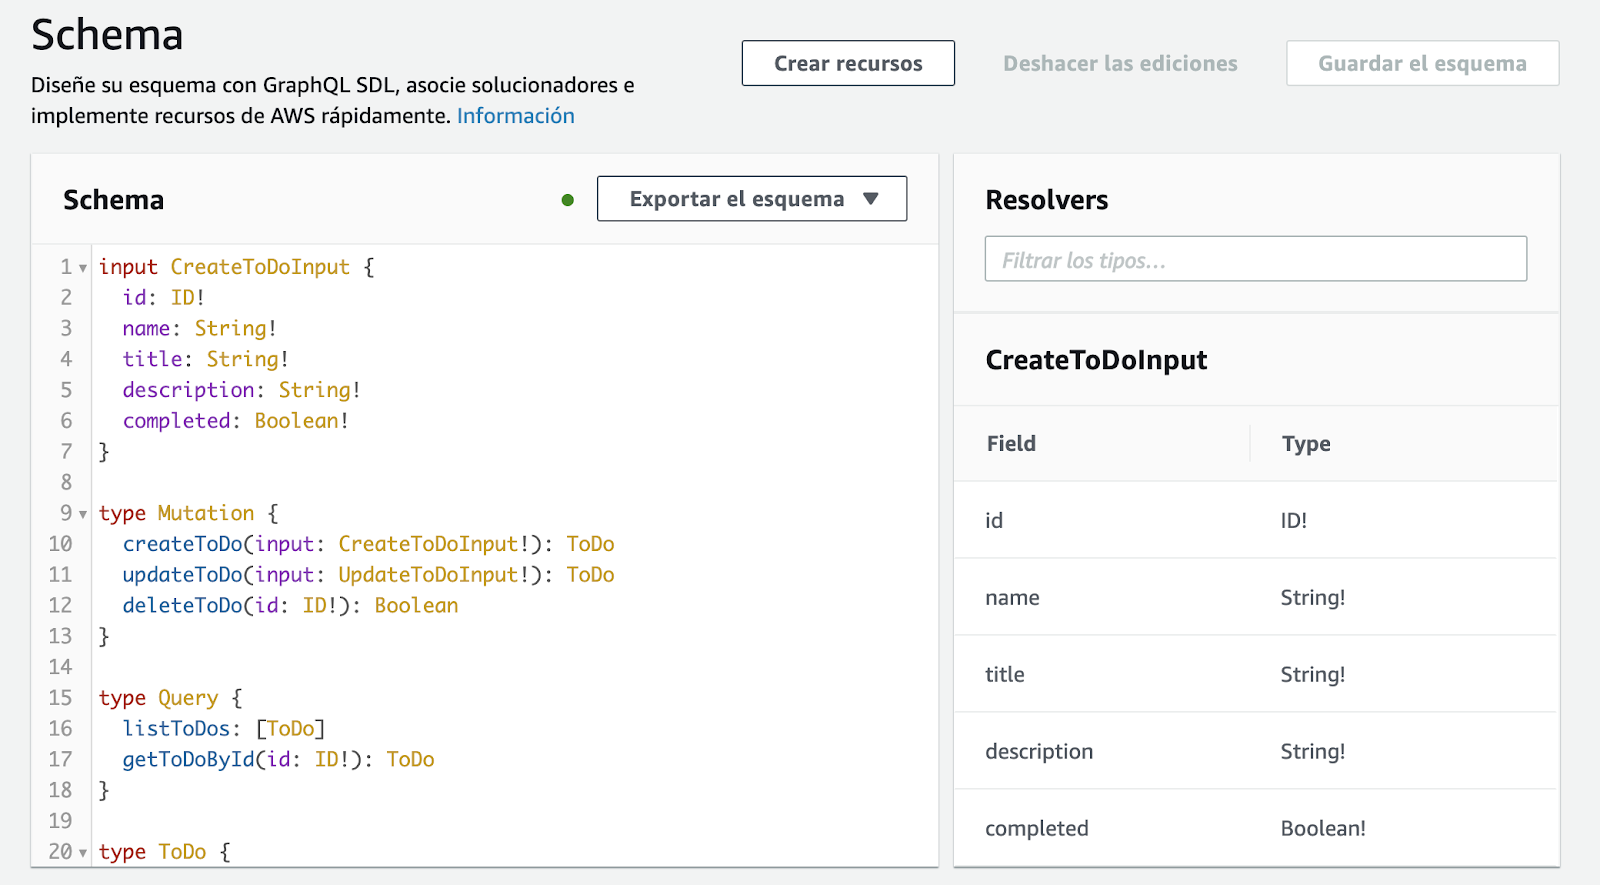
If we open AWS AppSync console, we will see the schema, the resolvers, the authentication and the data source that we have defined.


![1](//images.ctfassets.net/51xdmtqw3t2p/38jvJWZzFIzGLXeuPAULHy/70ebd476682d5a05dd8ba70cb48839f5/1.png)


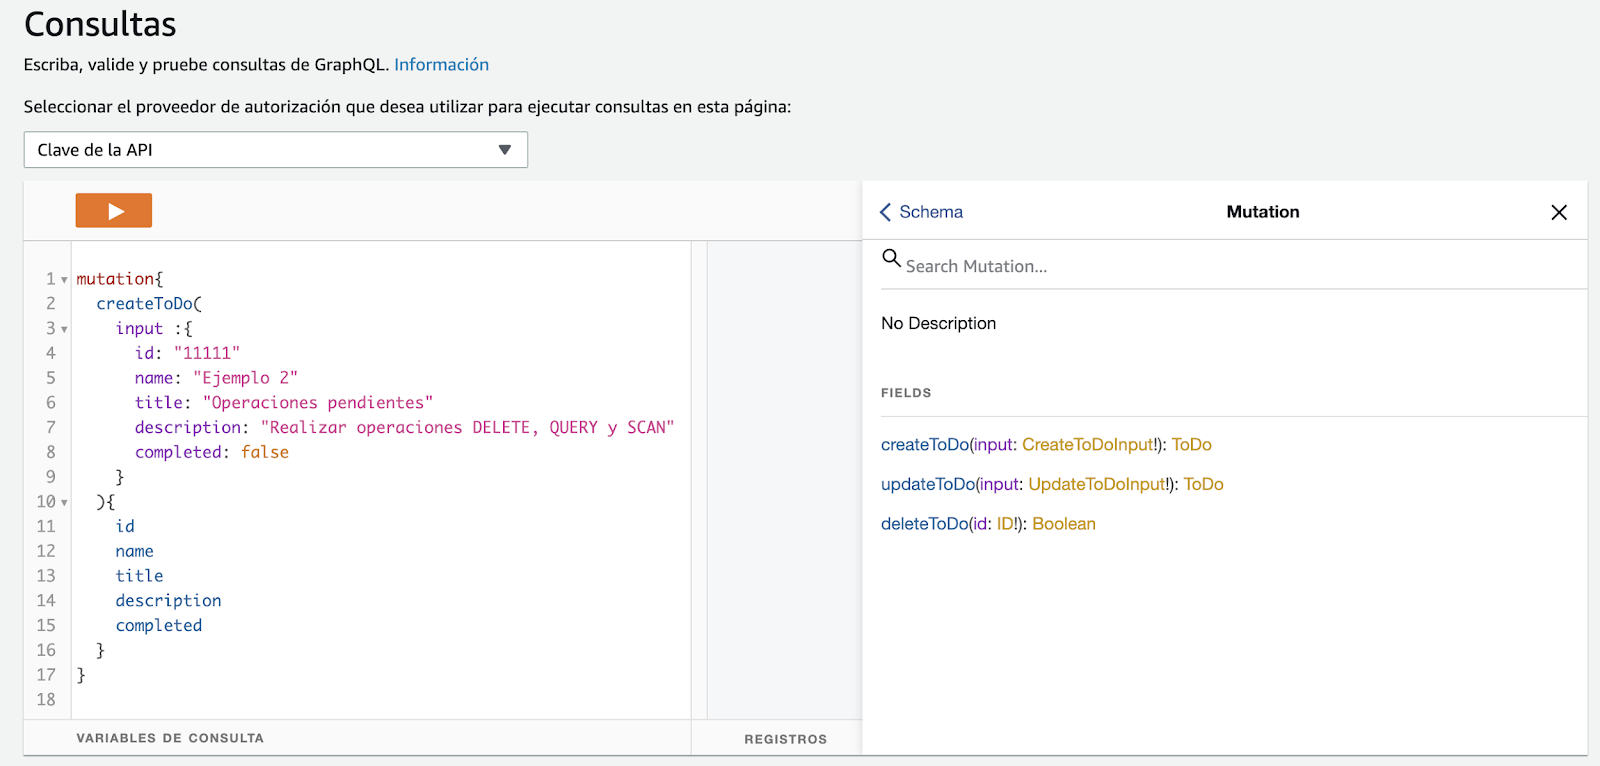
On the other hand, we also have a GraphQL client that we will use to test our API. In the Figure below, we can see the API's documentation according to the schemas defined.


![2](//images.ctfassets.net/51xdmtqw3t2p/2Vc4LvOnbdPFSVrQLQxvVx/c75d14d482037f1262f9f56908cce231/2.png)


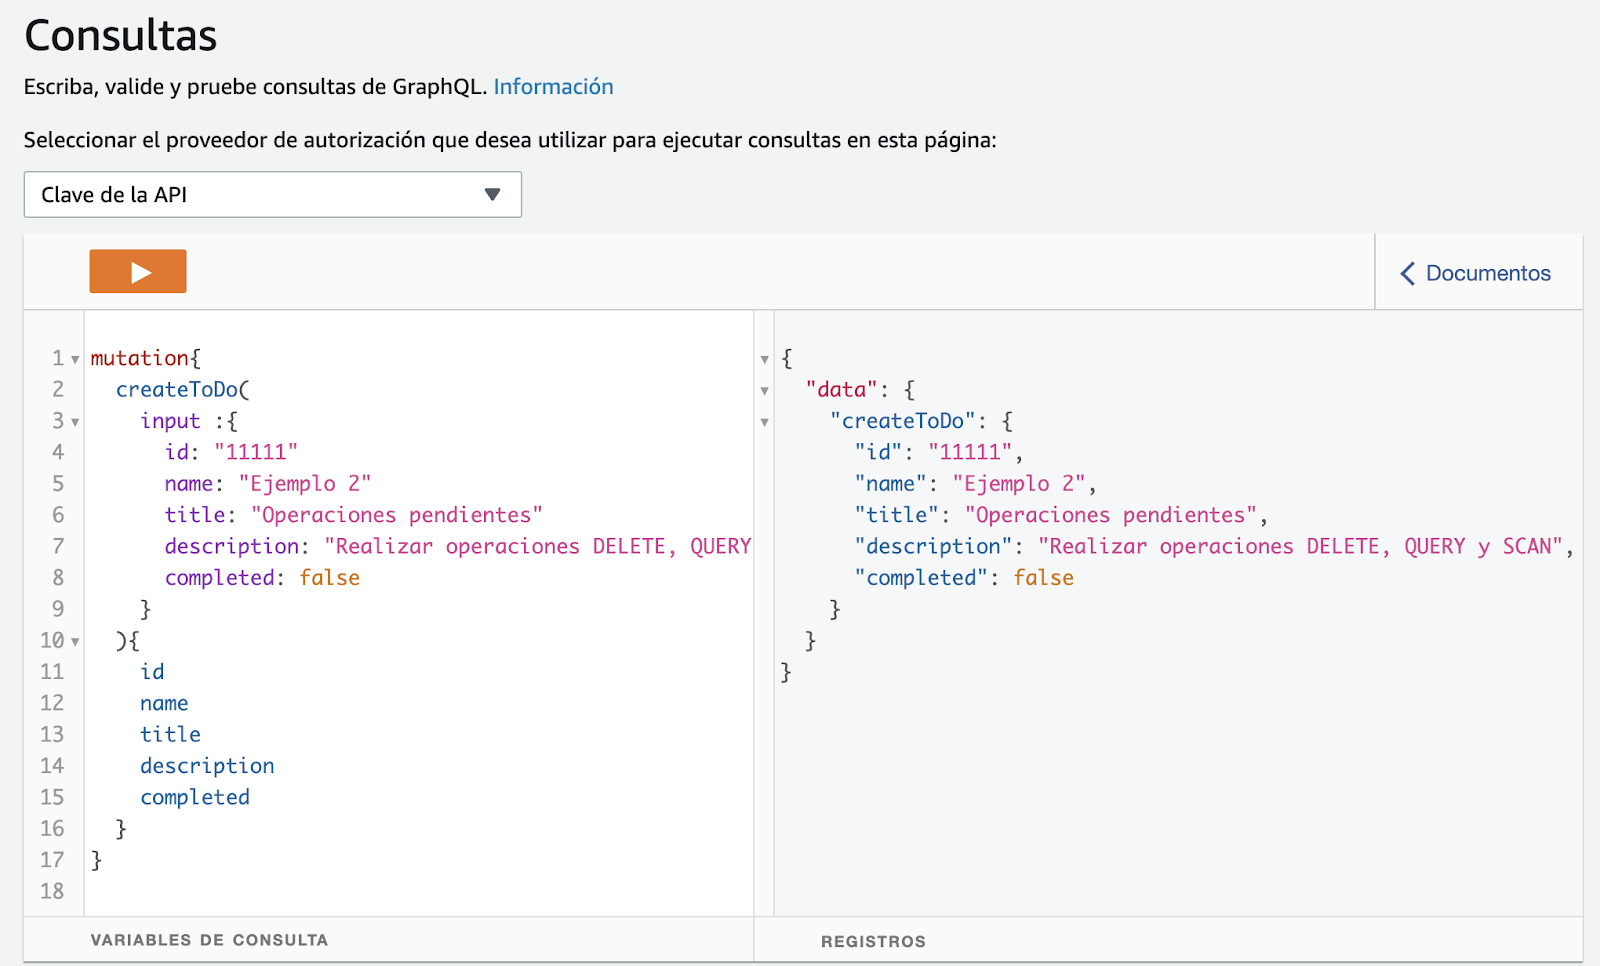
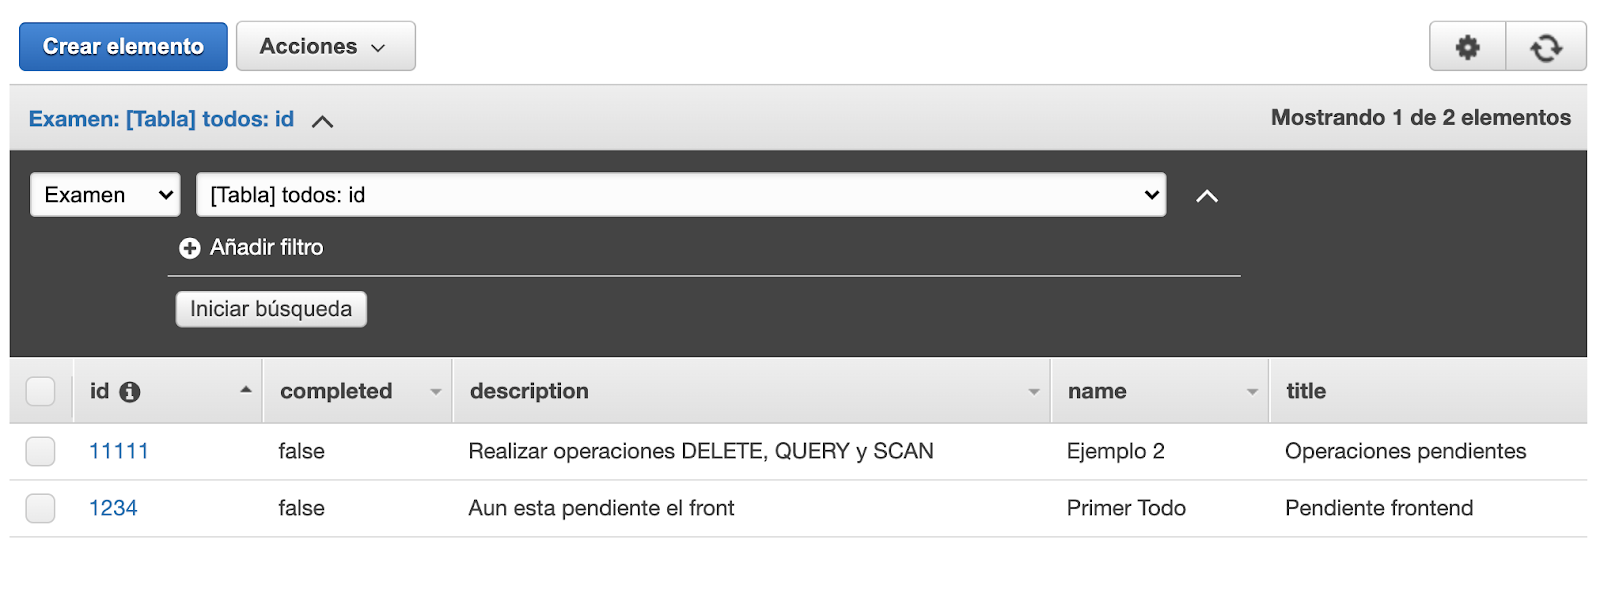
When executing the createToDo **mutation operation** a registry is created in DynamoDB and returns the object created according to the defined fields.


![3](//images.ctfassets.net/51xdmtqw3t2p/2N63LoqxNDUNntXI1jyvF9/175900fec088c5ffa1b5b47f2b0278f1/3.png)


![4](//images.ctfassets.net/51xdmtqw3t2p/28XQHlO0GGHd9nfnRjuoZx/8d323149837cf818cfea1cf326678e75/4.png)


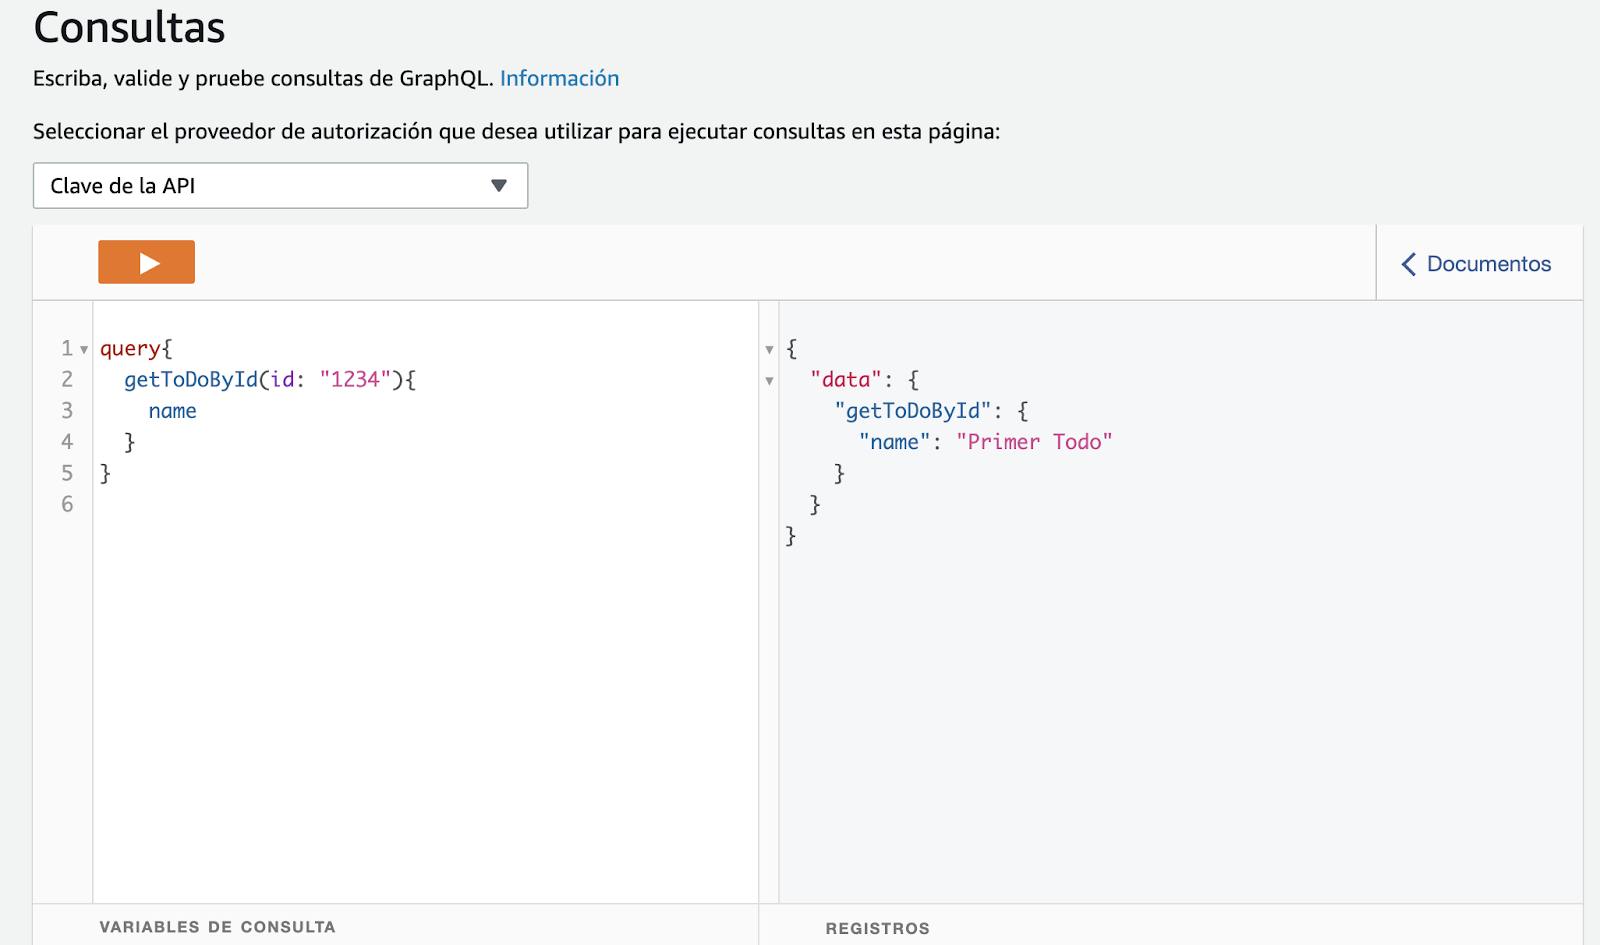
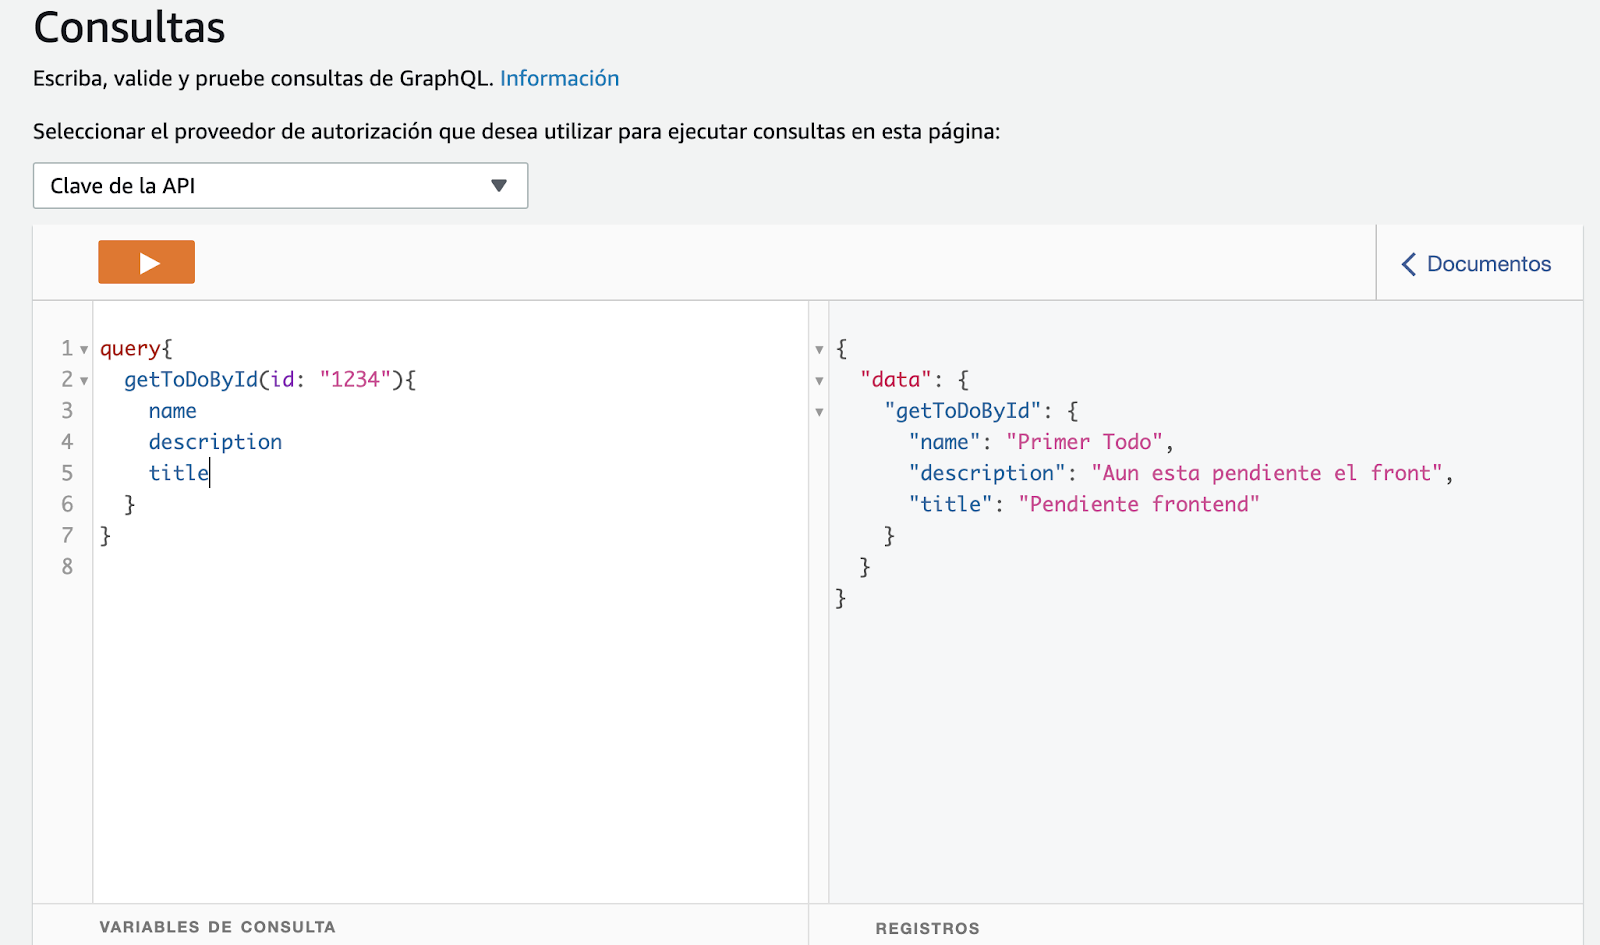
To retrieve data from a ToDo, we should execute the getToDoById **query operation**. We can request the field **name** only, or those that are necessary.


![5](//images.ctfassets.net/51xdmtqw3t2p/76oayQ1SYwYAwiiwUaR2Jg/8961d007947bbde203072dc0c221dbd4/5.png)


![6](//images.ctfassets.net/51xdmtqw3t2p/4m9ABOfoYUtN0iYijubnGT/5774f1bfa0299539fc6ab49c698ff445/6.png)


---


There you have:


**In this article, we described GraphQL basic concepts, we designed a simple API from scratch, and deployed it using AWS AppSync and Serverless Framework.**


**Remember that a second part is to come, where we will create a client-side application to consume the API. We will use Amplify+React JS framework, and we will fit our API with more features by using subscriptions for a case of real-time use.**


Join us in the second part of this article!

Be the life of the party with the latest information on digital payments.

Subscribe to our Kushki Hub to receive alerts about our new content.

Suscribe illustration
Don't know which product is right for your business?
Does the world of payments catch your attention?

More about our kushki Hub

Kushki Arrives at Mexico

Kushki arrives in Mexico! "For some time now, we have seen in Mexico a very big opportunity for development", said our founder, Sebastián Castro, during an interview with Forbes Mexico. So we are happy to announce that we have opened our offices in this country. Despite the COVID-19 pandemic, this year has brought many opportunities for Kushki because the confinement led many businesses to make their payments digital or to expand their payment channels to include wire transfers, credit or debit cards, and even cash. Sebastián says: “companies we talked to earlier in the year and that didn't have in mind to take the next step to this phase, found us later to start with it immediately. All this has become a strong impulse for us, and we don't think that it will stop in the future”. In this way, we continue to grow, we succeeded in reaching Mexico, and opened our offices in the country with the help of our investor, DILA Capital, which has been a big ally in this process. Mexico has a great development potential with regards to payment channels Around 96% of the businesses are still run offline, as Sebastián pointed out in his interview with Forbes. This country and its inhabitants, as well as all in Latin America, would obtain great benefits from digital transformation, and we want to be part of this process. After all, we want to connect Latin America with our payment platform. If you want to know more about this, we invite you to read the Forbes article: La Fintech Kushki quiere hacer de México su principal fortaleza en Latam (The fintech Kushki wants to make Mexico its main fortress in Latam).
Avatar img
Stella Vargas
Líder de contenido @Kushki
agosto 11, 2020

A/B testing using Google optimize

Do you think that your website could have a better conversion rate or more visits if you make some changes? Did your developer or marketing team suggest you to modify some things, but you are not totally sure or convinced that it is the best thing to do? Here we will show you how to perform tests on two or more versions of a website using a very useful tool by Google, called Optimize. Thus, you will be able to decide what works best in your site, based on actual data, instead of making assumptions. First, What is A/B Testing? In the first place, you must know that, an A/B test is a random experiment in which two or more variants of the same website (A and B) are used. Variant A is the original, and variant B (or C, D, F, or as many variants as needed) contains at least one modified element in the page. The idea is to check which of all versions is the most efficient or has a better performance, depending on your objectives. The development of these tests can be confusing at the beginning, so it is advisable to start doing small experiments, such as changing the color of a button or removing an unnecessary field from a form. When you have got used to creating variants and experiments, you may expand the scope of your tests. Performing tests with your website can help you to reduce bounce rates (people who abandon your page), improve your content and increase your conversion rates, among other things. However, this is not always the most advisable option. You should not use A/B tests when: You have few visits, because it would be more desirable to focus your efforts in increasing your traffic before performing any tests. Your page has programming problems or something is not working properly. Focus on solving this first. The cost of performing these experiments is greater than the profit they can provide you. Second, What is Google Optimize? It is a Google platform that allows users to perform different A/B testing campaigns. The most interesting thing about Google Optimize is that it takes A/B Testing to the next level, allowing you to show two or more variants of a website to the users (up to 5, with the new update of the platform). Another interesting functionality are the redirect tests(or redirection tests). These allow you to perform tests in independent websites by sending a percentage of your traffic to one website version and a percentage to another. Why Use Google Optimize? Apart from multivariate or redirection tests, some of their numerous advantages, we can highlight the following: Connection and integration with Google Analytics 360 suite. Potential for deeper analyses directly from Google Analytics interface. User-friendly visual editor for anyone with no coding background, for the creation of simple experiments. Now, you know what A/B testing is and why applying it in Google Optimize is a great alternative; let's see what are steps to follow for implementing it. Then, we will create a small project using Angular in which we will change the style of a button. We will make it more noticeable, and we will check the number of times that users click on it. State a Hypothesis Before creating an experiment for the first time, it is of great help identifying the problem you have to solve, and then, stating a hypothesis about what you might change to improve it. Once your hypothesis is ready, evaluate under several parameters, such as its level of reliability, its impact on macro objectives and how easy it is to configure it, etc. For example, let's say that a website is not 'converting' as much as you expected (defining “convert” as actions such as closing a sale or generating a registry). After analyzing all the possible causes for your results, you have determined that changing the call-to-action (CTA) button could influence the result. A possible hypothesis could be that, if you change the color of the call-to-action button, the conversion rate would improve by a 20%. Create an Experiment Using Google Optimize When you have defined your hypothesis, it is time to install the Google Optimize tool in your website to enable testing. You should have created a Google Optimize account before this. If you do not have one yet, go here and create your free account. Create a New Experience Once your account has been created, log in to the platform to start doing A/B tests. In the first place, you should create a new experience, this is where you will configure your experiments. Then, select "A/B test". Add a New Variant You can add up to five variants per experiment, and they can be edited later. After creating a variant, you have to edit its content; you will need to install the Chrome extension that is available here. Then, click on the Edit Button of the created variant and, if you already have a Google Optimize extension, a web editor will be displayed. We will use this editor to make the changes that we stated in our hypothesis. For our current example, change the color of the button from white to blue, and add an icon to it. Also, rename the Web page as “Version B”. The result obtained should be the following: Also, assign the website traffic redirection value to 50%, so that you can demonstrate your results quickly. Linking Google Analytics to Google Optimize To link these two services, insert the script below in the index.html file of your project; this will allow the data obtained to be sent to Google Analytics. It is important to insert this script, as it will help you to obtain information on the objectives established for the experiment and demonstrate the results using Google Analytics. (function(i,s,o,g,r,a,m){i['GoogleAnalyticsObject']=r;i[r]=i[r]||function(){ (i[r].q=i[r].q||[]).push(arguments)},i[r].l=1*new Date();a=s.createElement(o), m=s.getElementsByTagName(o)[0];a.async=1;a.src=g;m.parentNode.insertBefore(a,m) })(window,document,'script','https://www.google-analytics.com/analytics.js','ga'); ga('create', 'UA-XXXXXXX-X', 'auto'); ga('require', 'GTM-XXXXXX'); ga('send', 'pageview'); It is also important for you to install a Google Optimize snippet for the experiment to render the two versions of your website. 1. Define the objectives of the experiment. Now, define the objectives of your experiment, you may choose them from a default list or you may create a personalized objective. This time, we will create a customized objective to register the number of clicks by users in the two versions of the website. For this experiment, the event Label was: “Click Blue Button” Test your experiment configuration It is important to verify that the configuration is correct; otherwise, the experiment will not render your website's Version B. For this, click on Verify Installation in the Configuration section of the Google Optimize snippet. This message should appear on screen: Send events Finally, send the click event to google Analytics. To do this, create a service in your Angular project; it will be responsible for triggering the event when you click on the button. This is the service: After defining the experiment criteria, you will be able to execute it. If you access from the browser to the website, you will see Version B. You can find the Angular project code here. Concluding the Experiment To observe the results of our experiment, we can log in to Google Analytics console. In the Event's section, we can check the number of calls to the event created: “Click Blue Button”. This number exceeds the number of times that the white button was clicked in more than 20%, and we could test the hypothesis that we stated for our experiment. How Long should the Experiment Last? According to Google's official documentation, it is recommended to continue the experiment until at least one of the following conditions has been fulfilled: That two weeks have elapsed, in order to observe cyclical variations in the web traffic of a whole week. At least one of the variants must show a 95% probability of exceeding the reference value (current website traffic before making any modifications). We hope that this article has been useful for you to perform tests on your website and to provide validated knowledge for decision-making in your website's or app design or user flow.
Avatar img
Francisco Limaico
Software Developer
agosto 03, 2020

How unit testing may prevent a disaster in computer systems?

Using unit tests can prevent disasters in computer systems. Learn how. When software developers start our professional path, we generally think about how fun it will be writing code to solve any type of problem or satisfy any needs our customers have. In pursuing such desire, our priorities are usually learning different programming languages, frameworks, design patterns, good practices, as well as other concepts, techniques and tools that will help us to accelerate and optimize code writing and functioning. However, an area that is quite forgotten, especially by startups and small companies in the software development industry, is precisely the establishment of tools allowing for writing, executing and measuring unit and integration testing; many people think that they result in a loss of time. In this article, I will explain why running this type of tests should be an essential part of the routine and discipline of a software developer. To achieve this, it is important to first understand certain concepts and, why not, to write a couple of tests. TDD When we are discussing unit testing, it is necessary to talk about TDD, and acronym for "Test Drive Development". This is an approach that allows developers to write code based on tests that have been previously written. This, with the purpose of making code writing (complying with the test) a natural and fast development. A TDD has the following workflow: As you can see in the chart, a TDD is quite strict regarding the order of what we must do for writing a test. Personally, I do not follow this order rigorously because I consider that each developer can adapt this process to their workflow. For example, in my day to day, I write code as follows: I define the method that I will implement in its respective interface. I write the implementation of the method, so that it returns the response that I expect, regardless of any internal logic. I write the test using super basic assertions, to ensure that the result is not indefinite. I integrate the logic of what my method will do, step by step. At the same time, I add what I need to my test; for example, if my first step is searching for a record in the database, I will make the respective change in the test to simulate that response, and then I will adjust my assertions according to the problem that I'm trying to solve. The step above will become a loop until the complete logic is obtained, similarly when there are conditions or errors that I should test. Finally, I will have to design additional tests to check such cases. Finally, I will adjust the assertions in my tests and perform a final analysis, in case I have to make a small refactoring in my tests or in the code itself. You can write high-quality tests as long as you have in mind what you want to test and why. At the beginning, they could be dark concepts, but will be clarified as you gain practice and experience. Unit Testing It is the validation of the smallest fragment of code, which can be a method or a function or a small class; this will depend a lot on the context where we are located. Below, I will describe in detail how to write a unit test using Mocha framework and an assertion library, Chai, in the backend execution environment of Javascript, Node.js. We will initialize our project in Node, using the following command from the terminal located in the directory that we have selected. bash npm init This command will ask us several things regarding our project, for this example, we will maintain the default values. The important point is that, as a result of the execution of this command, we will obtain the package.json file within the root file of our directory. json { "name": "unittesting", "version": "1.0.0", "description": "simple examples about unit testing with mocha on node.js", "main": "index.js", "scripts": { "test": "echo "Error: no test specified" && exit 1" }, "author": "", "license": "ISC" } Then, we install Mocha and Chai as development units. bash $ npm install --save-dev mocha chai We create in the file service.spec.js within the src directory in the root directory of the project. We write one test with the purpose of creating a function that, after receiving the greetType parameter, if the value is 1, the result of its execution is a friendly greeting with this text: "Hello, how are you sir?” Then, we design another test so that the result, for any other value, will be: "Hi, What's up bro". describe("Unit Test Examples", function() { it("getMessage should greet kindly", function() { const greetType = 1; const response = service.greet(greetType); expect(response).to.be.eqls(`Hello, how are you sir?`); }); it("getMessage should greet", function() { const greetType = 1; const response = service.greet(greetType); expect(response).to.be.eqls(`Hi, What's up bro`); }); }); ``` In this fragment, we import our service.js file, that will contain our getMessage method, then we use describe and it, which are provided by Mocha, to encapsulate our assertions and to write our test. They receive a first parameter that is a description of what they contain, namely, what we are going to test, and a function that will be responsible for executing our tests. We execute our tests by executing the command in the terminal. bash $ npx mocha ./service.spec.js The result, as we have expected, is an error, since we have not yet written the code for the function nor exported it from the service.js file. ```bash Unit Test Examples 1) getMessage should greet kindly 2) getMessage should greet 0 passing (20ms) 2 failing 1) Unit Test Examples getMessage should greet kindly: TypeError: service.greet is not a function at Context.(src\service.spec.js:7:34) 2) Unit Test Examples getMessage should greet: TypeError: service.greet is not a function at Context.(src\service.spec.js:14:34) ``` Type the code of the function that complies with the test in the service.js file within the src directory. javascript module.exports = { greet: function (greetType) { if(greetType === 1) return `Hello, how are you sir?`; else return `Hi, What's up bro`; } }; In this fragment, we simply export the greet function, which receives as an argument a number and returns a message based on that number. We will execute the test again. bash $ npx mocha ./service.spec.js Now we will obtain a satisfactory result. ```bash Unit Test Examples √ getMessage should greet kindly √ getMessage should greet 2 passing (26ms) ``` Let's suppose that we made a code refactorization, and this time, the number that triggers the kind greeting will be 3. javascript module.exports = { greet: function (greetType) { if(greetType === 3) return `Hello, how are you sir?`; else return `Hi, What's up bro`; } }; We will execute the test again. ```bash Unit Test Examples 1) getMessage should greet kindly √ getMessage should greet 1 passing (23ms) 1 failing 1) Unit Test Examples getMessage should greet kindly: AssertionError: expected 'Hi, What\'s up bro' to deeply equal 'Hello, how are you sir?' + expected - actual + -Hi, What's up bro + +Hello, how are you sir? And, as we might expect, this time one of the tests has failed due to the changes that we have made in our function. With this small exercise, we begin to understand what we obtain by writing unit tests for our code. Benefits of Performing Unit Tests Speed. Today, computer systems change faster with time, so they must be adaptable to the requirements they're trying to comply. For example, a simple system for image processing probably will require more processable formats. Unit tests will help us to prevent that any changes that we make in our code affect the use cases that are working without errors or bugs. Quality. For any serious company in the software development business or that depends on software developed in-house, it is crucial to ensure the quality of the code of its applications. Unit tests act as a sieve that will allow us to filter the greatest quantity of potential bugs within their modules, and to correct them in time. Evidently, we will not be able to reduce all these incidents entirely, but this will mitigate them in a large percentage. Makes code analysis and debugging easier. Unit tests can help us to debug our code in a much simpler way. If we have errors in the production environment, and we don't know their cause, we can start executing tests in a local environment and play with the parameters that could be generating the error. This saves us time because we do not have to launch a patch without even knowing if it is going to work. Design. When we think about the things that we have to test, planning the future design of our code is also a side effect. In this case, we will ask ourselves: Should this method go within this class? or, can I disconnect this method using a static class?. The answers to these questions give us feedback to improve the architecture and design of our code, which in turn will result in greater legibility and maintainability for the code. Resource saving. In all industries, time and money are capital factors. The benefits described above are translated into a decrease in the time that developers use to solve bugs, perform changes, adaptations or improvements. This, in turn, allows them to be more productive and generate greater value for the company. An Advice, from Developer to Developer When I started my professional career, I never focused in anything more than writing the code that I needed to solve the problems that my customer's applications required. Most of the time, I spent hours manually testing code to solve bugs or to apply changes to my code. So, one of the biggest challenges that I had to face when I started working in Kushki was adapting to the strict scheme that the company had in place concerning unit tests, as the smallest line of code must be tested. Thus, I learned that, as developers, we have to invest a great percentage of our time in learning how to write tests that generate value for our work teams, our projects, employers and customers. Searching for new testing tools that provide us greater speed, quality, efficiency, security and maintainability is fundamental. The language in which we learn to write these tests is not so important because when technology changes, we will already have strong foundations to be able to migrate without headaches. Conclusion There is an infinite number of technologies and tools that allow us to write unit tests; each work team is responsible for searching and choosing the ones that better adapt to their workflow and to the objectives they try to fulfill, as well as to the different programming languages available in the market of this industry. Even if the concept of unit test is small and concise, it is an extremely powerful resource. As we have seen, there is no excuse to not write unit tests for our projects. Benefits can be noticed from the first moment that we have decided to apply them. Tests help us to understand better the technologies that we are using and the problems that we are solving. In an extreme case, our unit tests can save us from a total disaster; just imagine that a pair of zeros were added or eliminated in a bank transaction, and that this error was executed millions of times before being detected.
Avatar img
Mauricio Morales
Software Developer
julio 28, 2020