How unit testing may prevent a disaster in computer systems?

Avatar img
Mauricio Morales
Software Developer
julio 28, 2020
Lectura de 2 minutos
How unit testing may prevent a disaster in computer systems?

Using unit tests can prevent disasters in computer systems. Learn how.

When software developers start our professional path, we generally think about how fun it will be writing code to solve any type of problem or satisfy any needs our customers have. In pursuing such desire, our priorities are usually learning different programming languages, frameworks, design patterns, good practices, as well as other concepts, techniques and tools that will help us to accelerate and optimize code writing and functioning.

However, an area that is quite forgotten, especially by startups and small companies in the software development industry, is precisely the establishment of tools allowing for writing, executing and measuring unit and integration testing; many people think that they result in a loss of time. In this article, I will explain why running this type of tests should be an essential part of the routine and discipline of a software developer. To achieve this, it is important to first understand certain concepts and, why not, to write a couple of tests.

TDD

When we are discussing unit testing, it is necessary to talk about TDD, and acronym for "Test Drive Development". This is an approach that allows developers to write code based on tests that have been previously written. This, with the purpose of making code writing (complying with the test) a natural and fast development. A TDD has the following workflow:

Unit Testing Flow Chart

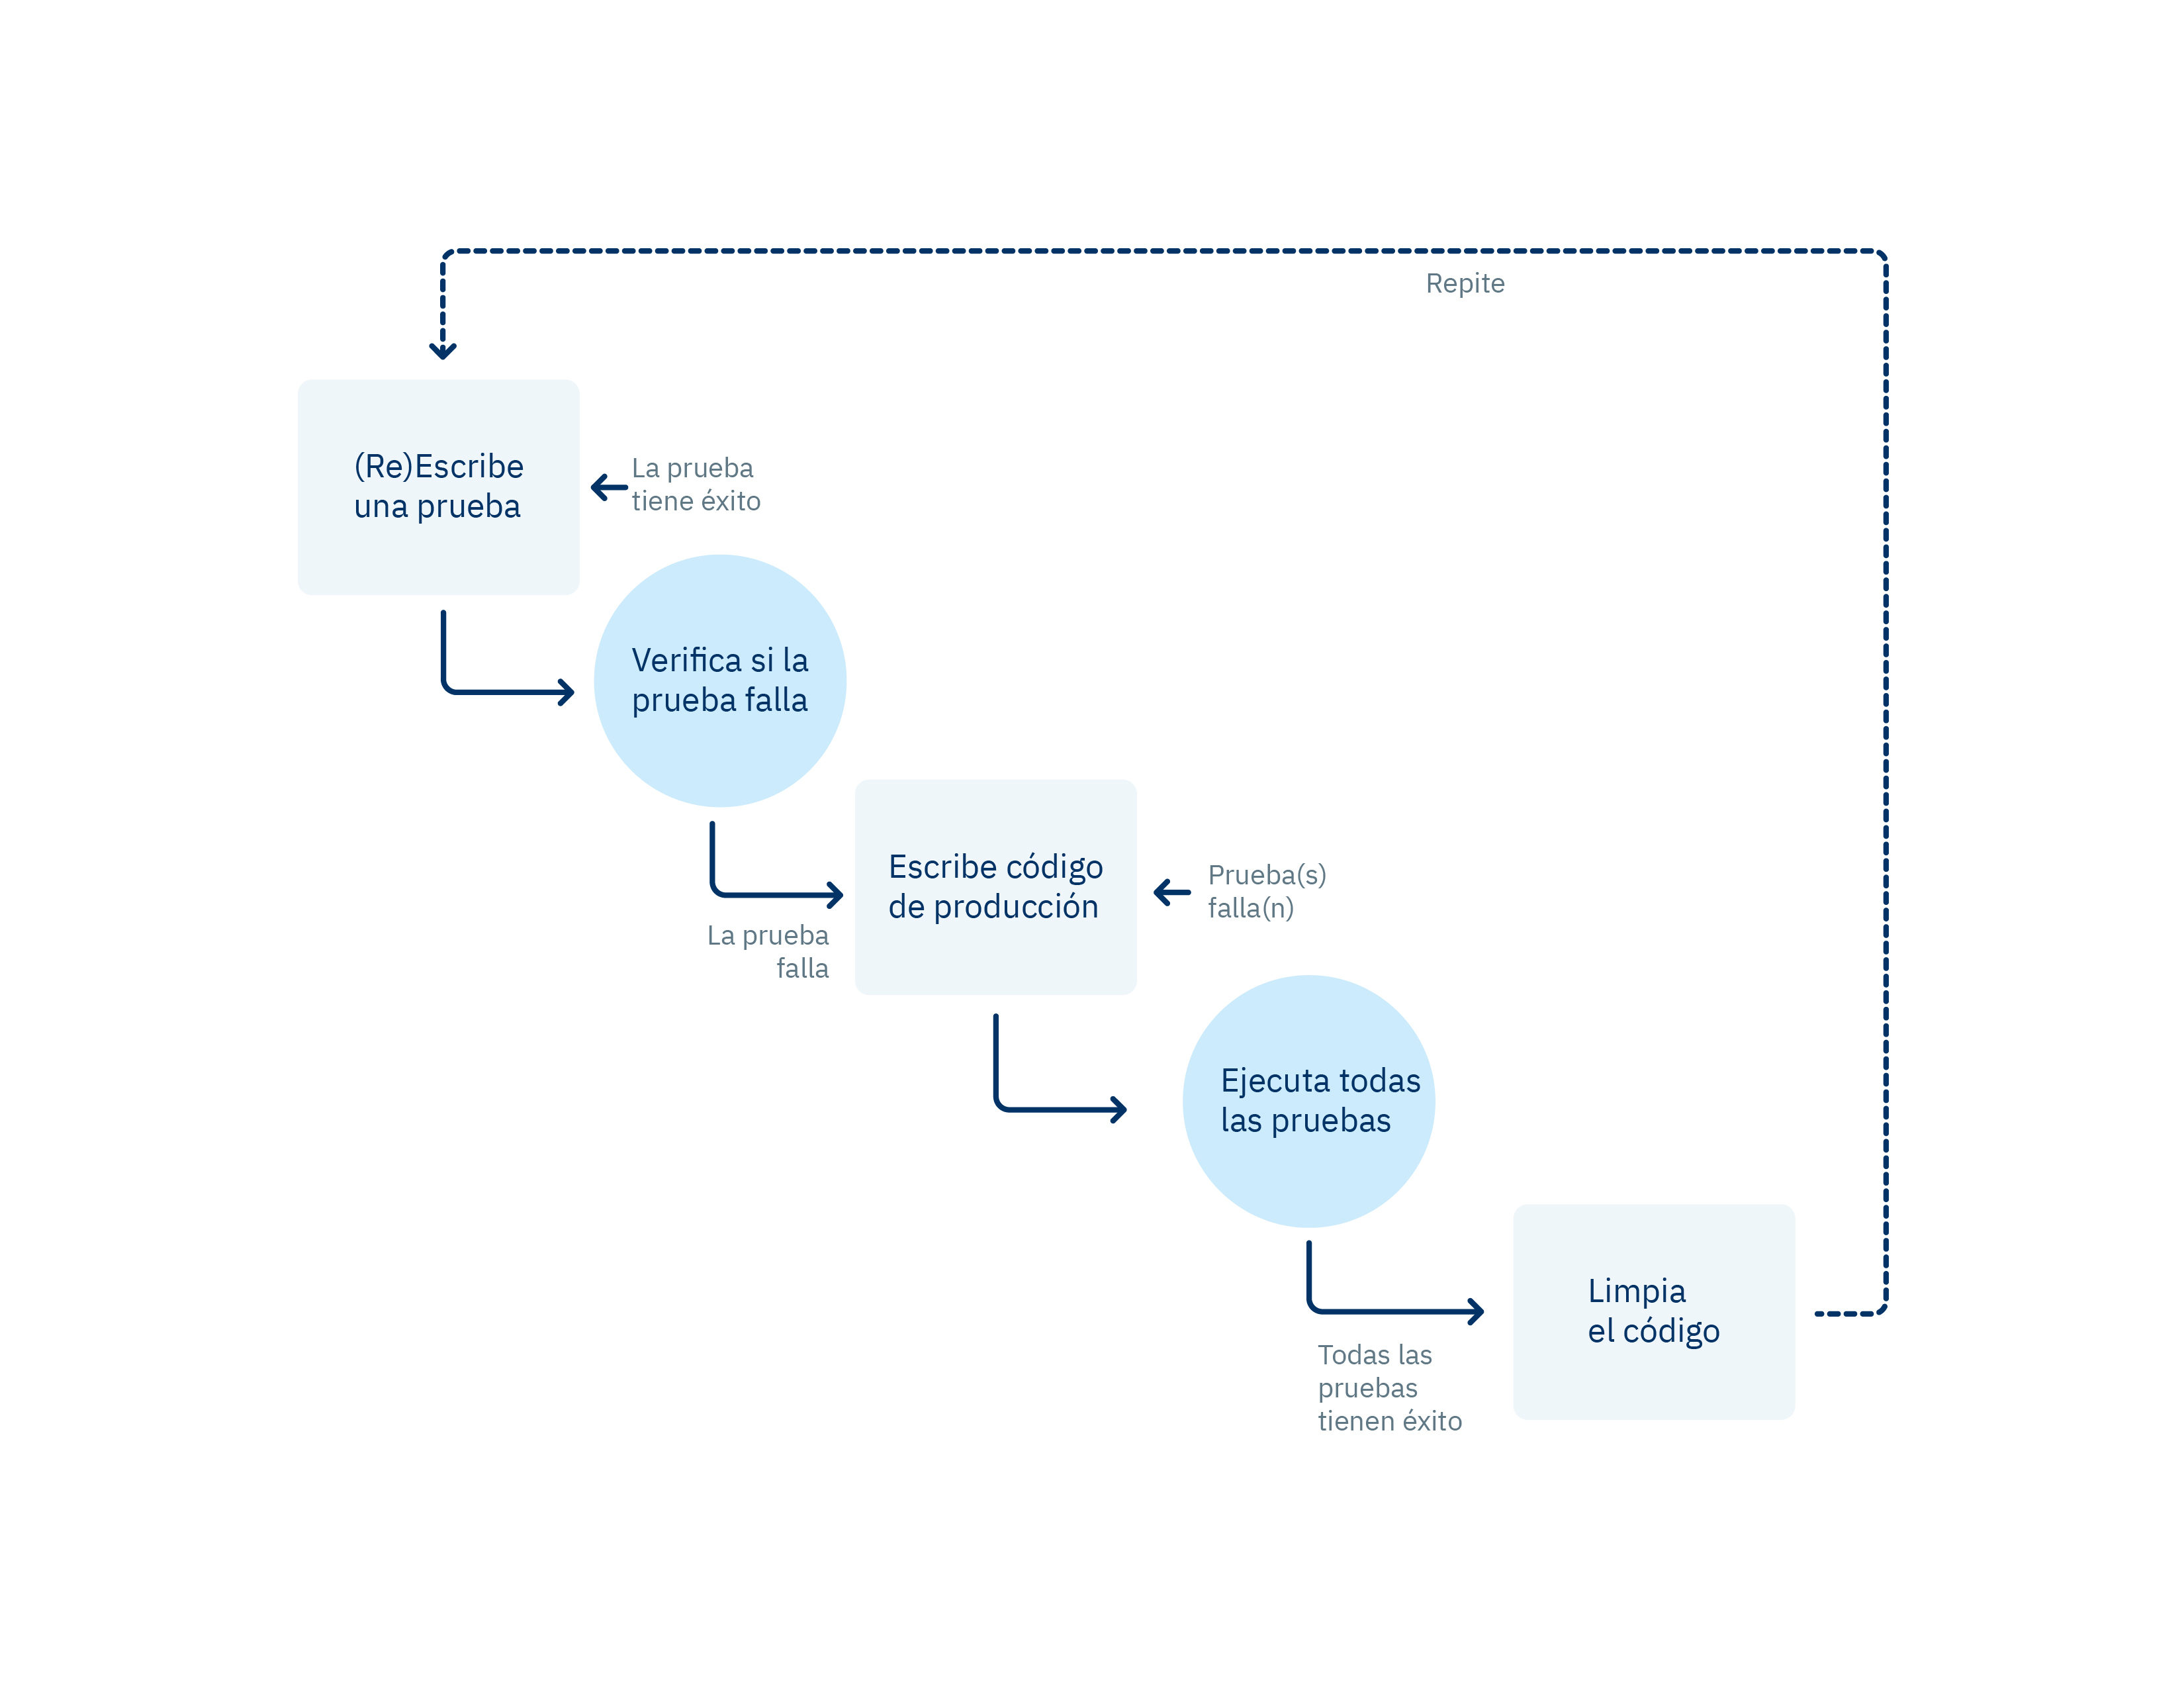
As you can see in the chart, a TDD is quite strict regarding the order of what we must do for writing a test. Personally, I do not follow this order rigorously because I consider that each developer can adapt this process to their workflow.

For example, in my day to day, I write code as follows:

  • I define the method that I will implement in its respective interface.
  • I write the implementation of the method, so that it returns the response that I expect, regardless of any internal logic.
  • I write the test using super basic assertions, to ensure that the result is not indefinite.
  • I integrate the logic of what my method will do, step by step. At the same time, I add what I need to my test; for example, if my first step is searching for a record in the database, I will make the respective change in the test to simulate that response, and then I will adjust my assertions according to the problem that I'm trying to solve.
  • The step above will become a loop until the complete logic is obtained, similarly when there are conditions or errors that I should test. Finally, I will have to design additional tests to check such cases.
  • Finally, I will adjust the assertions in my tests and perform a final analysis, in case I have to make a small refactoring in my tests or in the code itself.

You can write high-quality tests as long as you have in mind what you want to test and why. At the beginning, they could be dark concepts, but will be clarified as you gain practice and experience.

Unit Testing

It is the validation of the smallest fragment of code, which can be a method or a function or a small class; this will depend a lot on the context where we are located.

Below, I will describe in detail how to write a unit test using Mocha framework and an assertion library, Chai, in the backend execution environment of Javascript, Node.js.

We will initialize our project in Node, using the following command from the terminal located in the directory that we have selected.

bash npm init

This command will ask us several things regarding our project, for this example, we will maintain the default values. The important point is that, as a result of the execution of this command, we will obtain the package.json file within the root file of our directory.

json { "name": "unittesting", "version": "1.0.0", "description": "simple examples about unit testing with mocha on node.js", "main": "index.js", "scripts": { "test": "echo "Error: no test specified" && exit 1" }, "author": "", "license": "ISC" }

Then, we install Mocha and Chai as development units.

bash $ npm install --save-dev mocha chai

We create in the file service.spec.js within the src directory in the root directory of the project. We write one test with the purpose of creating a function that, after receiving the greetType parameter, if the value is 1, the result of its execution is a friendly greeting with this text: "Hello, how are you sir?” Then, we design another test so that the result, for any other value, will be: "Hi, What's up bro".

  
describe("Unit Test Examples", function() { it("getMessage should greet kindly", function() { const greetType = 1; const response = service.greet(greetType);
  
expect(response).to.be.eqls(`Hello, how are you sir?`);
  
});
  
it("getMessage should greet", function() { const greetType = 1; const response = service.greet(greetType);
  
expect(response).to.be.eqls(`Hi, What's up bro`);
  
}); }); ```
  
In this fragment, we import our service.js file, that will contain our getMessage method, then we use describe and it, which are provided by Mocha, to encapsulate our assertions and to write our test. They receive a first parameter that is a description of what they contain, namely, what we are going to test, and a function that will be responsible for executing our tests.
  
We execute our tests by executing the command in the terminal.
  
bash $ npx mocha ./service.spec.js
  
The result, as we have expected, is an error, since we have not yet written the code for the function nor exported it from the service.js file.
  
```bash Unit Test Examples 1) getMessage should greet kindly 2) getMessage should greet
  
0 passing (20ms) 2 failing
  
1) Unit Test Examples getMessage should greet kindly: TypeError: service.greet is not a function at Context.(src\service.spec.js:7:34)
  
2) Unit Test Examples getMessage should greet: TypeError: service.greet is not a function at Context.(src\service.spec.js:14:34) ```
  
Type the code of the function that complies with the test in the service.js file within the src directory.
  
javascript module.exports = { greet: function (greetType) { if(greetType === 1) return `Hello, how are you sir?`; else return `Hi, What's up bro`; } };
  
In this fragment, we simply export the greet function, which receives as an argument a number and returns a message based on that number.
  
We will execute the test again.
  
bash $ npx mocha ./service.spec.js
  
Now we will obtain a satisfactory result.
  
```bash Unit Test Examples √ getMessage should greet kindly √ getMessage should greet
  
2 passing (26ms) ```
  
Let's suppose that we made a code refactorization, and this time, the number that triggers the kind greeting will be 3.
  
javascript module.exports = { greet: function (greetType) { if(greetType === 3) return `Hello, how are you sir?`; else return `Hi, What's up bro`; } };
  
We will execute the test again.
  
```bash Unit Test Examples 1) getMessage should greet kindly √ getMessage should greet
  
 1 passing (23ms)  
 1 failing  
 1) Unit Test Examples  
 getMessage should greet kindly:  
 AssertionError: expected 'Hi, What\'s up bro' to deeply equal 'Hello, how are you sir?'  
 + expected - actual  
 + -Hi, What's up bro  
 + +Hello, how are you sir?
  

And, as we might expect, this time one of the tests has failed due to the changes that we have made in our function.

With this small exercise, we begin to understand what we obtain by writing unit tests for our code.

Benefits of Performing Unit Tests

  • Speed. Today, computer systems change faster with time, so they must be adaptable to the requirements they're trying to comply. For example, a simple system for image processing probably will require more processable formats. Unit tests will help us to prevent that any changes that we make in our code affect the use cases that are working without errors or bugs.

  • Quality. For any serious company in the software development business or that depends on software developed in-house, it is crucial to ensure the quality of the code of its applications. Unit tests act as a sieve that will allow us to filter the greatest quantity of potential bugs within their modules, and to correct them in time. Evidently, we will not be able to reduce all these incidents entirely, but this will mitigate them in a large percentage.

  • Makes code analysis and debugging easier. Unit tests can help us to debug our code in a much simpler way. If we have errors in the production environment, and we don't know their cause, we can start executing tests in a local environment and play with the parameters that could be generating the error. This saves us time because we do not have to launch a patch without even knowing if it is going to work.

  • Design. When we think about the things that we have to test, planning the future design of our code is also a side effect. In this case, we will ask ourselves: Should this method go within this class? or, can I disconnect this method using a static class?. The answers to these questions give us feedback to improve the architecture and design of our code, which in turn will result in greater legibility and maintainability for the code.

  • Resource saving. In all industries, time and money are capital factors. The benefits described above are translated into a decrease in the time that developers use to solve bugs, perform changes, adaptations or improvements. This, in turn, allows them to be more productive and generate greater value for the company.

An Advice, from Developer to Developer

When I started my professional career, I never focused in anything more than writing the code that I needed to solve the problems that my customer's applications required. Most of the time, I spent hours manually testing code to solve bugs or to apply changes to my code. So, one of the biggest challenges that I had to face when I started working in Kushki was adapting to the strict scheme that the company had in place concerning unit tests, as the smallest line of code must be tested.

Thus, I learned that, as developers, we have to invest a great percentage of our time in learning how to write tests that generate value for our work teams, our projects, employers and customers. Searching for new testing tools that provide us greater speed, quality, efficiency, security and maintainability is fundamental. The language in which we learn to write these tests is not so important because when technology changes, we will already have strong foundations to be able to migrate without headaches.

Conclusion

There is an infinite number of technologies and tools that allow us to write unit tests; each work team is responsible for searching and choosing the ones that better adapt to their workflow and to the objectives they try to fulfill, as well as to the different programming languages available in the market of this industry.

Even if the concept of unit test is small and concise, it is an extremely powerful resource. As we have seen, there is no excuse to not write unit tests for our projects. Benefits can be noticed from the first moment that we have decided to apply them. Tests help us to understand better the technologies that we are using and the problems that we are solving.

In an extreme case, our unit tests can save us from a total disaster; just imagine that a pair of zeros were added or eliminated in a bank transaction, and that this error was executed millions of times before being detected.

Be the life of the party with the latest information on digital payments.

Subscribe to our Kushki Hub to receive alerts about our new content.

Suscribe illustration
Don't know which product is right for your business?
Does the world of payments catch your attention?

More about our kushki Hub

COVID-19: A new Challenge to Strengthen and Create Strategies to Ensure Continuity in Customer Service

Covid-19: A new challenge to strengthen and create strategies for the continuity of customer service. The emergence of the coronavirus epidemic (COVID-19) took us all by surprise, causing concern and anxiety. Although as human beings, we constantly adapt to the multiple changes that originate from the dynamics of the world, this new virus conflicted numerous aspects, most of them related to our health, social relations, the labour market, and the economy; among others. To overcome this, at Kushki we had to look for alternatives in the way we work, thinking about the safety of workers and customer satisfaction. And a question emerged: How can we improve customer service in pandemic times? To answer it, we had to think carefully what the needs and requests of our customers are and make changes in our support area, according to them. In this article, we will explore some procedures that made possible the following changes: Regarding our workers' safety, we opted for working home office, thus reducing the exposure of the company personnel to the coronavirus. For this reason, we encouraged measures aimed at decreasing the risk and the spread of contagion. Additionally, we implemented virtual daily follow-up meetings, where we constantly evaluated customer satisfaction indicators. This helped us to develop continuous improvement activities for increasing the service's quality. On the other hand, we enhanced our worker's job skills through courses and customer service trainings in order to promote active listening, which increases efficiency, for meeting the requirements from old and new customers in a more effective way. In this way, we also take care of our customers, providing the necessary equipment to respond to the multiple requests they may have. This is why it was essential to work on rising awareness among the staff through training. It's worth emphasizing the pandemic encouraged businesses that did not previously have technological platforms to seek alternatives, such as our payment gateway, for the development of their commercial activities, and for offering their services and products through electronic applications. This led to an increase in online requests, so training the staff adequately was critical to face the increase in the demand. Today, we continue to work on taking the necessary measures to guarantee a high-quality service for our customers, implementing all the biosafety policies that have been decreed by the governments in the countries where we operate and by our own company. Of course, the COVID-19 pandemic poses big challenges, so we will continue setting clear tasks in order to satisfy the needs of the shops affiliated to our platform, and taking actions for the protection of our workers. Finally, we are continually performing updates according to the progression of the crisis caused by the pandemic, implementing changes in different support processes, reviewing the requests that we receive, evaluating the possible solutions to emerging needs and projecting support strategies in the shortest time possible. Additionally, thanks to the active listening strategy towards our customers, we are performing technical developments in our products according to the requirements and needs that they have expressed. As a company, we need to think and constantly worry about our customers, understanding that they are also being affected by the changes that have come about. Therefore, it is necessary to strengthen and create strategies for ensuring the continuity of our customer service, keeping as a priority the value that we can deliver to them at these moments of hardship, developing the changes we mentioned, where the empowerment and improvement of the electronic service channels will help us to continue giving accurate advice to our customers.
Avatar img
Daniel Castañeda
Analista de Soporte
julio 16, 2020

Self-Service: Key to Obtaining a Successful Customer Experience

Learn more about Self-service Have you been overwhelmed with thousands of customer requests and think that hiring staff is the only solution? Does it scare you to have multiple support channels open to the public? Do you think that customer service can only be provided by your agents? You do not know how to improve customer satisfaction rates? What to do if response and resolution times grow and grow without control? These are only some of the most common questions that service directors often have to solve, and sometimes, the solutions to these issues, rather than complex, are the result of an arduous planning and information analysis process. And you might ask: “Information analysis? How?, I manage everything using Excel and the process control takes up all my time. I can barely generate some reports to measure the service and, now, implementing a service tool to optimize my job will have a very high cost. It's impossible at this moment when cost saving is critical”. The reality is that the most important thing for your service area is information. Based on it, it would be possible to take any measures that bring about a radical change to failures that have been detected inside the service desk. This will be your cornerstone for knowledge building, it will allow users to self-manage their concerns, frequently asked questions, and even to deal with common technical issues in your process or in third parties processes that form part of your service. To start with this, we recommend you to establish a system that not only will help you to receive information from the support channels that you've made available for your users (e-mail, chat, social media, customer service portals, etc.), but also will allow you to perform an adequate analysis of the collected information. Based on this information and its analysis, you will build your knowledge base, which your customers could use to: Self-manage their requirements Provide important information that will help you to improve published content. Rate your publications. The most important thing is that you will give time to your agents to focus on solving more complex issues that can generate greater value for the organization (this will occur in so far as the published information is accurate and as expected by your users). Did you know that 60% of customers seek to solve their incidents or queries by themselves? This increases exponentially their satisfaction levels, and the explanation lies in a very basic but powerful concept: being able to solve any problem without requiring support from a third person, makes human beings feel better about themselves and increases their level of happiness. This type of solutions are best applied in conjunction with a Chat-Bot system, giving users an online experience when answering their queries, fed on the information that you have collected to build your knowledge base, and reducing the workload of your service teams. In conclusion, if your strategy is based on giving the best possible service experience to your customers, you should always consider implementing good tools that allow you to collect as much information as possible about their requests and, based on this information, to create high-level content that they can use to solve their questions. Ideally, you should complement this with a portal that not only provides this customer service, but that also allows you to interact and have a dynamic and two-way communication flow.
Avatar img
Juan Pablo Herrera
VP Service @ Kushki
junio 17, 2020

Micro-Frontends Using Single-SPA Framework

A micro-frontends architecture is a design approach in which a web application is broken down in individual, semi-independent micro parts that work together. This architecture can be as open as you wish, and each application can be implemented using different frameworks. The micro-frontend concept is widely inspired by microservices. As for micro-frontends, it is important to note that even when an application is divided into several projects, each one of them will be integrated into a single one. Thus, for the final user, everything would seem to be a unique application, instead of many of them. Although micro-frontends have started to receive lots of attention lately, there is not a single way of implementing them. In fact, there are a variety of approaches, depending on the objectives and requirements at each organization. At present, some of the best known implementations are: Single-SPA Framework: This framework allows for the implementation of micro-frontends by combining other frameworks (React, Angular, Vue, etc). This is the implementation that we use at Kushki; we will explain it in more detail below. IFrames: They isolate micro applications in iframes by using Window.postMessage APIs to coordinate multiple frames. IFrames share APIs exposed by the parent window. Web Components: Front-end applications only deal with routing; they make decisions about the set of components to be displayed, and the orchestration of events among different web components. Monolithic SPA versus Micro-Frontends For Kushki's case, we will analyze the example of an application built with the purpose of allowing our customers to edit and view a variety of configurations available in our payment system, among other actions. This application was originally built as an SPA monolithic structure created in Angular 5. The application grew so much that, at some point, it contained more than 200,000 lines of code and about 13 rather complex components. All this resulted in an application that gradually became very difficult to maintain, and operating different features at the same time was an issue. For this reason, we decided to change to micro-Frontends, in order to continue the development of this application. Several alternatives were analyzed, but the most mature alternative, with the best documentation, then and now, is the Single-SPA framework. In the beginning, we chose to migrate of the application while maintaining the framework with which the SPA monolithic structure was made (Angular). In a first version of the new micro-frontend, it was decided that each of the original application components would become a micro-frontend. But, one of the difficulties that we found with this first version was the navigation bar, which had to be shared by all applications. Because of this, we decided to create an Angular library, which was installed in each micro-frontend. In this way, the first version of our first application with micro-frontends was released. It had the following structure: Over time, we realized that our first idea, converting the navigation bar into an Angular library that has to be installed at each of our micro-frontends and updated for each application every time a change was made in the navigation, was not practical, and limited us to use only Angular for the development of our micro-frontends. A Single-SPA framework requires the use of an index.html file, where all micro-frontends that are to be used by the application are registered. This file is called a root config file within the framework, and it usually contains a single HTML file where some framework methods are used to ensure that everything works correctly. Then, to solve the problem of our navigation bar at Kushki, we decided that our framework root config file would not be a single HTML file, but rather a SPA built in Angular. We migrated all the logic that we had in the library to this one and configured the index.html library that Angular generates, to ensure that it works correctly with the configurations required by the framework (all this will be explained in more detail through an example below). With this change, we managed to start developing micro-frontends, not only in Angular, but also in React. As a result, the original structure changed a little, and was established as follows: When we abandoned our SPA monolithic structure and started using micro-frontends in our application, we managed to separate the multiple features we had in one place and optimized the introduction of new functionalities. However, this does not mean that micro-frontends can be used for any project. For the vast majority of cases, a SPA monolithic structure is probably more than enough. A micro-frontends architecture is more suitable for large applications that group many functionalities. In Kushki, the vast majority of our SPAs are still monolithic structures, because they are not so big. This is why implementing this architecture must be considered only if a project is expected to have scalability problems over the medium- to long-term. An Example of Micro-Frontends using a Single-SPA Framework For this example, we are going to create a root application in React, where 2 applications created using a Single-SPA framework will be registered: one with Angular and one with React. Part 1: Create a Root Config. Application For the root application, only a web application created using create-react-app is needed. For this example, we are going to use npm as a javascript package administrator, and Typescript because it offers multiple benefits and it is now supported by React. npx create-react-app root-config-app --template typescript --use-npm Once our application has been created, we have to add single-spa to our project to be able to register our micro-frontends and browse through them. npm i single-spa The next step is editing the index.html file of the project to add the necessary scripts and imports to make our application work. Our file should look as follows: <!DOCTYPE html> <html lang="en"> <head> <meta charset="utf-8" /> <link rel="icon" href="%PUBLIC_URL%/favicon.ico" /> <meta name="viewport" content="width=device-width, initial-scale=1" /> <meta name="theme-color" content="#000000" /> <meta name="description" content="Web site created using create-react-app" /> <link rel="apple-touch-icon" href="%PUBLIC_URL%/logo192.png" /> <!-- manifest.json provides metadata used when your web app is installed on a user's mobile device or desktop. See https://developers.google.com/web/fundamentals/web-app-manifest/ --> <link rel="manifest" href="%PUBLIC_URL%/manifest.json" /> <!-- Notice the use of %PUBLIC_URL% in the tags above. It will be replaced with the URL of the `public` folder during the build. Only files inside the `public` folder can be referenced from the HTML. Unlike "/favicon.ico" or "favicon.ico", "%PUBLIC_URL%/favicon.ico" will work correctly both with client-side routing and a non-root public URL. Learn how to configure a non-root public URL by running `npm run build`. --> <title>React App</title> <meta name="importmap-type" content="systemjs-importmap"> <script type="systemjs-importmap"> { "imports": { "@single-spa-test/app-angular": "http://localhost:4200/main.js", "@single-spa-test/app-react": "http://localhost:8080/app-react.js" } } </script> <script type="systemjs-importmap" src="https://storage.googleapis.com/react.microfrontends.app/importmap.json"></script> <script src="https://cdn.jsdelivr.net/npm/systemjs@6.2.5/dist/system.min.js"></script> <script src="https://cdn.jsdelivr.net/npm/systemjs@6.2.5/dist/extras/amd.min.js"></script> <script src="https://cdn.jsdelivr.net/npm/systemjs@6.2.5/dist/extras/named-exports.min.js"></script> <script src="https://cdn.jsdelivr.net/npm/systemjs@6.2.5/dist/extras/named-register.min.js"></script> <script src="https://cdn.jsdelivr.net/npm/import-map-overrides/dist/import-map-overrides.js"></script> <script src="https://unpkg.com/zone.js"></script> </head> <body> <noscript>You need to enable JavaScript to run this app.</noscript> <div id="root"></div> <!-- This HTML file is a template. If you open it directly in the browser, you will see an empty page. You can add webfonts, meta tags, or analytics to this file. The build step will place the bundled scripts into the <body> tag. To begin the development, run `npm start` or `yarn start`. To create a production bundle, use `npm run build` or `yarn build`. --> </body> </html> To avoid adding unnecessary CSS to our brief example, we are going to add Material IU to our project and add a quick navigation example. npm i @material-ui/core We add a new Nav component to our project, where we will copy the navigation example. import React from 'react'; import { createStyles, Theme, makeStyles } from '@material-ui/core/styles'; import Drawer from '@material-ui/core/Drawer'; import AppBar from '@material-ui/core/AppBar'; import CssBaseline from '@material-ui/core/CssBaseline'; import Toolbar from '@material-ui/core/Toolbar'; import List from '@material-ui/core/List'; import Typography from '@material-ui/core/Typography'; import ListItem from '@material-ui/core/ListItem'; import ListItemText from '@material-ui/core/ListItemText'; const drawerWidth = 240; const useStyles = makeStyles((theme: Theme) => createStyles({ root: { display: 'flex', }, appBar: { zIndex: theme.zIndex.drawer + 1, }, drawer: { width: drawerWidth, flexShrink: 0, }, drawerPaper: { width: drawerWidth, }, drawerContainer: { overflow: 'auto', }, content: { flexGrow: 1, padding: theme.spacing(3), }, }), ); export default function ClippedDrawer() { const classes = useStyles(); return ( <div className={classes.root}> <CssBaseline /> <AppBar position="fixed" className={classes.appBar}> <Toolbar> <Typography variant="h6" noWrap> Single-SPA Root Config </Typography> </Toolbar> </AppBar> <Drawer className={classes.drawer} variant="permanent" classes={{ paper: classes.drawerPaper, }} > <Toolbar /> <div className={classes.drawerContainer}> <List> <ListItem button> <ListItemText primary="App Angular" /> </ListItem> <ListItem button> <ListItemText primary="App React" /> </ListItem> </List> </div> </Drawer> <main className={classes.content}> <Toolbar /> <div id="single-spa-application:app-angular"></div> <div id="single-spa-application:app-react"></div> </main> </div> ); } We edit the App.tsx file to include our new component. It should look as follows: import React from 'react'; import Nav from './Nav'; function App() { return ( <React.Fragment> <Nav /> </React.Fragment> ); } export default App; Once we have has done all this, we obtain a application as the following: Part 2: Creating Single-SPA Micro-frontends Angular To create an Angular application using single-SPA, we'll simply create an SPA using the CLI provided by the framework. It is important to create the application using an Angular router, so that the micro-frontend works correctly. ng new app-angular Once the application has been created, we have to install the Single-SPA framework in our project. To do this, we must follow the instructions that we find in the framework documentation. ng add single-spa-angular This command automatically configures the framework in our application. We also have the possibility of installing manually (you can find the details in the documentation mentioned above). Finally, we will create a simple component that we are going to show in this application and configure the routes that will be used by this SPA. ng g c angular In the route file, a main route must be configured, which must coincide with the route that is registered in the single-spa of the root config. It is also important to configure the Routing Module providers. The file should be configured as follows: import { NgModule } from '@angular/core'; import { Routes, RouterModule } from '@angular/router'; import { APP_BASE_HREF } from "@angular/common"; import { AngularComponent } from './angular/angular.component'; const routes: Routes = [ { path: "angular", component: AngularComponent, } ]; @NgModule({ imports: [RouterModule.forRoot(routes)], exports: [RouterModule], providers: [{ provide: APP_BASE_HREF, useValue: "/" }] }) export class AppRoutingModule { } That is all that we have to do when creating a micro-frontend using this framework. Once you've followed these simple steps, you'll be able to edit your Angular application as you wish. React To create a micro-frontend using React it is necessary to use the manager provided by the Single-SPA framework (create-single-spa). We should enter React when when the manager asks which framework to use. npx create-single-spa And, with React, this is all we have to configure. Part 3: Register Micro-Frontends using Single-SPA Once we've created the micro-frontends, we have to register them in the root config application that we created in Part 1. To do this, we must edit the index.tsx file as follows: import React from 'react'; import ReactDOM from 'react-dom'; import App from './App'; import { LifeCycles, registerApplication, start } from "single-spa"; ReactDOM.render( <React.StrictMode> <App /> </React.StrictMode>, document.getElementById('root') ); registerApplication({ name: "app-angular", app: (): Promise<LifeCycles> => (window as any).System.import("http://localhost:4200/main.js"), activeWhen: "/angular" }); registerApplication({ name: "app-react", app: (): Promise<LifeCycles> => (window as any).System.import("@single-spa-test/app-react"), activeWhen: "/react" }); start(); To be able to execute this example, you must run the following commands: npm start # root config app npm run serve:single-spa # angular app npm start # react app With all the applications running, we will have a completely functional micro-frontends example, developed in different frameworks, and in very few steps. You can find the full code of the example we explained in this article in the following repository: Micro frontends single spa example
Avatar img
Francisco Izurieta
Tech Lead de Payments @Kushki
junio 08, 2020