Canary Deployments and how to sleep peacefully at night

Avatar img
Patricio Moreano
Tech Lead @ Kushki
septiembre 16, 2020
Lectura de 2 minutos
Canary Deployments and how to sleep peacefully at night

Canary-type implementations

Today, you will learn about a technique where code deployed to production will not be replaced instantly by the previous code, but within a time frame and under a controlled environment, so you can sleep peacefully at night.


It is a widespread idea that the only way technology companies can deploy their code to production is at non-working hours and opening maintenance windows for their clients.

This is an old practice adopted by big companies, and it works to some extent, but at what cost? At the cost of having a dedicated team for those deployments, extra hours, night schedules and a significant workload for employees and companies.

In addition, when introducing new features to production, even after full tests have been performed (point-to-point testing and unit testing), there is always the risk of the human factor, because nobody is perfect and something can fail. For this reason, companies prefer to deploy code at non-working hours. To solve these overwhelming problems, that often deprive software developers from their precious sleep, canary deployments were invented.

A canary deployment is a technique where code deployed to production is not replaced by the previous code instantly, but within a time frame and under a controlled environment; errors, statistics and other features are monitored to replace the complete code or to roll back to the previous one. This, my dear reader, is what I will tell you in this article.

Canary Deployment

Canary Deployment 2

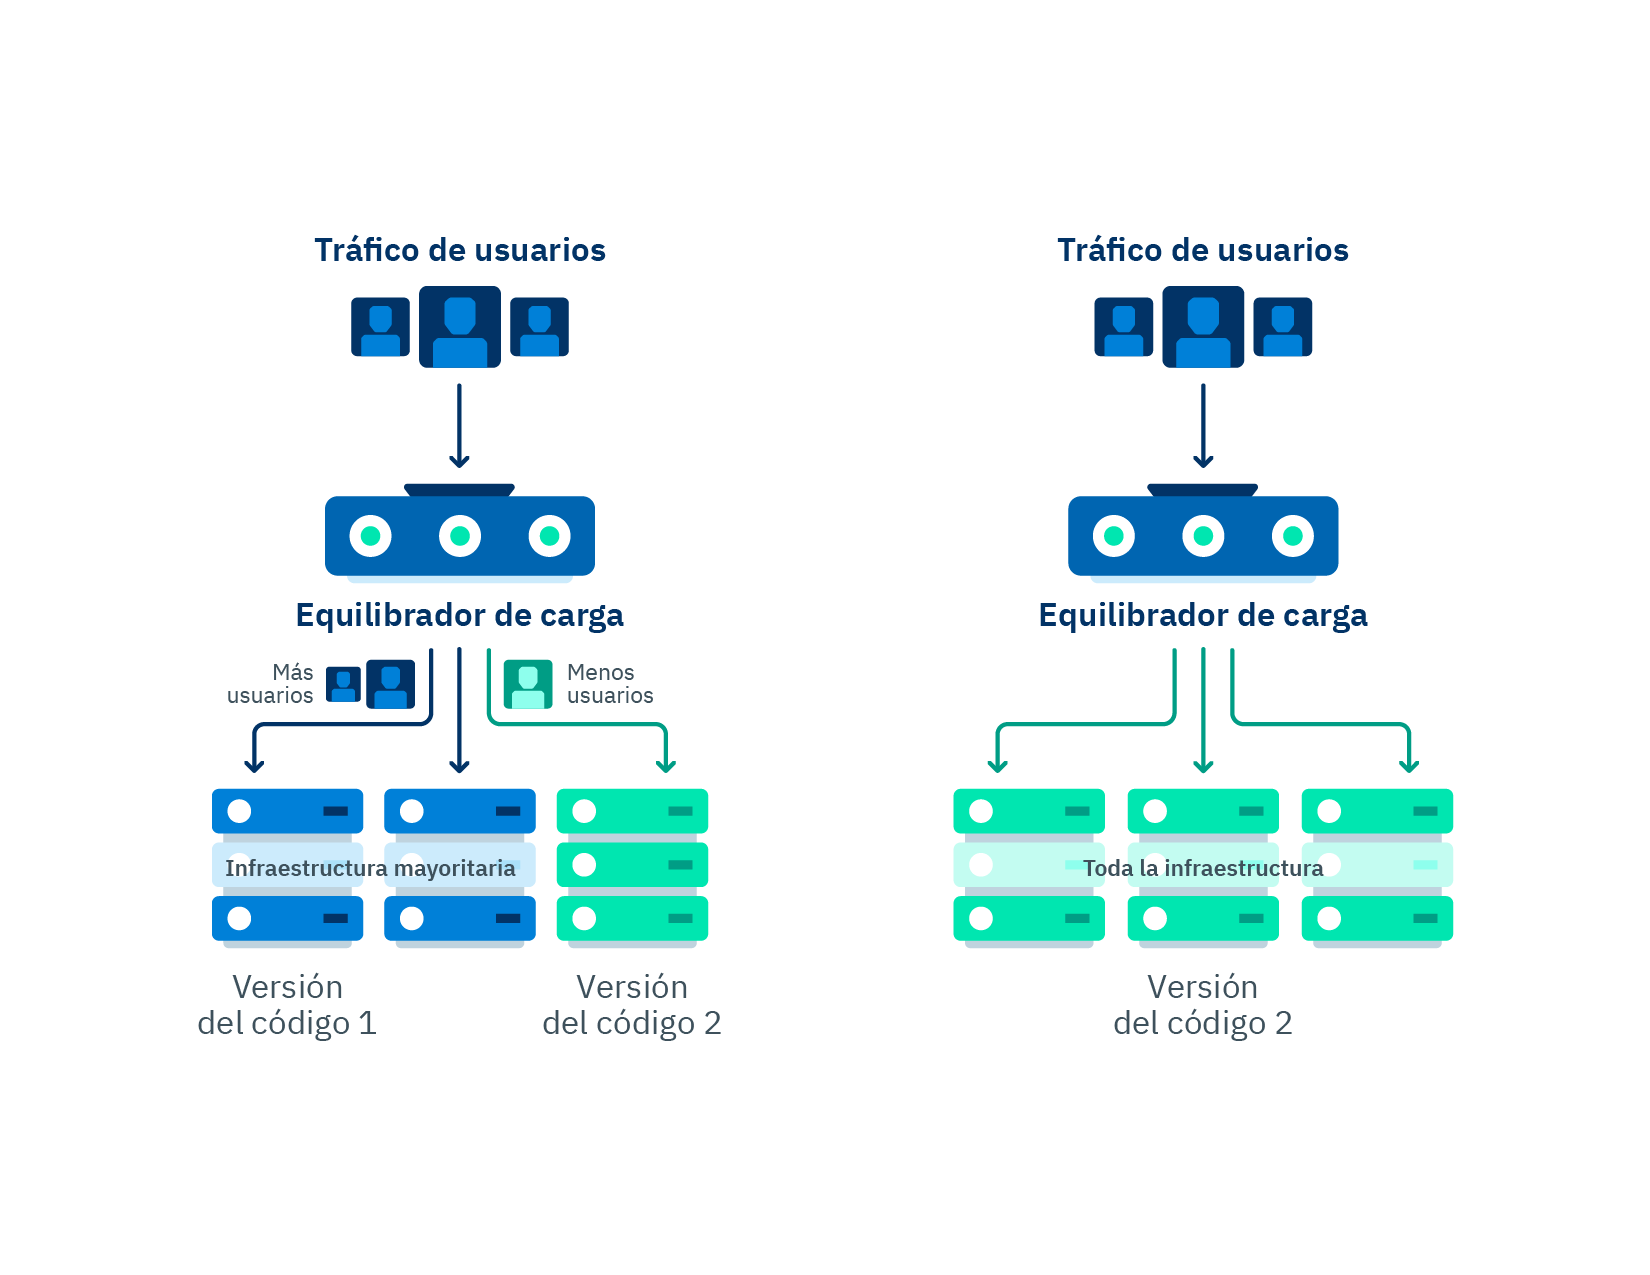
Flow chart of a canary deployment, before, during and after deployment.

Canary deployments were developed precisely to satisfy the need and the obsession of software developers to achieve control over even the smallest detail of a deployment to production. Nobody likes inserting bugs in production, but they are something we all programmers have had to deal with, and we know that they will not disappear because they come from the imperfection of human nature. Nevertheless, we can reduce those bugs to the minimum and, if they occur, they can be limited to just some components and non-critical features of a product or a service. We can minimize them in both number and impact to the product.

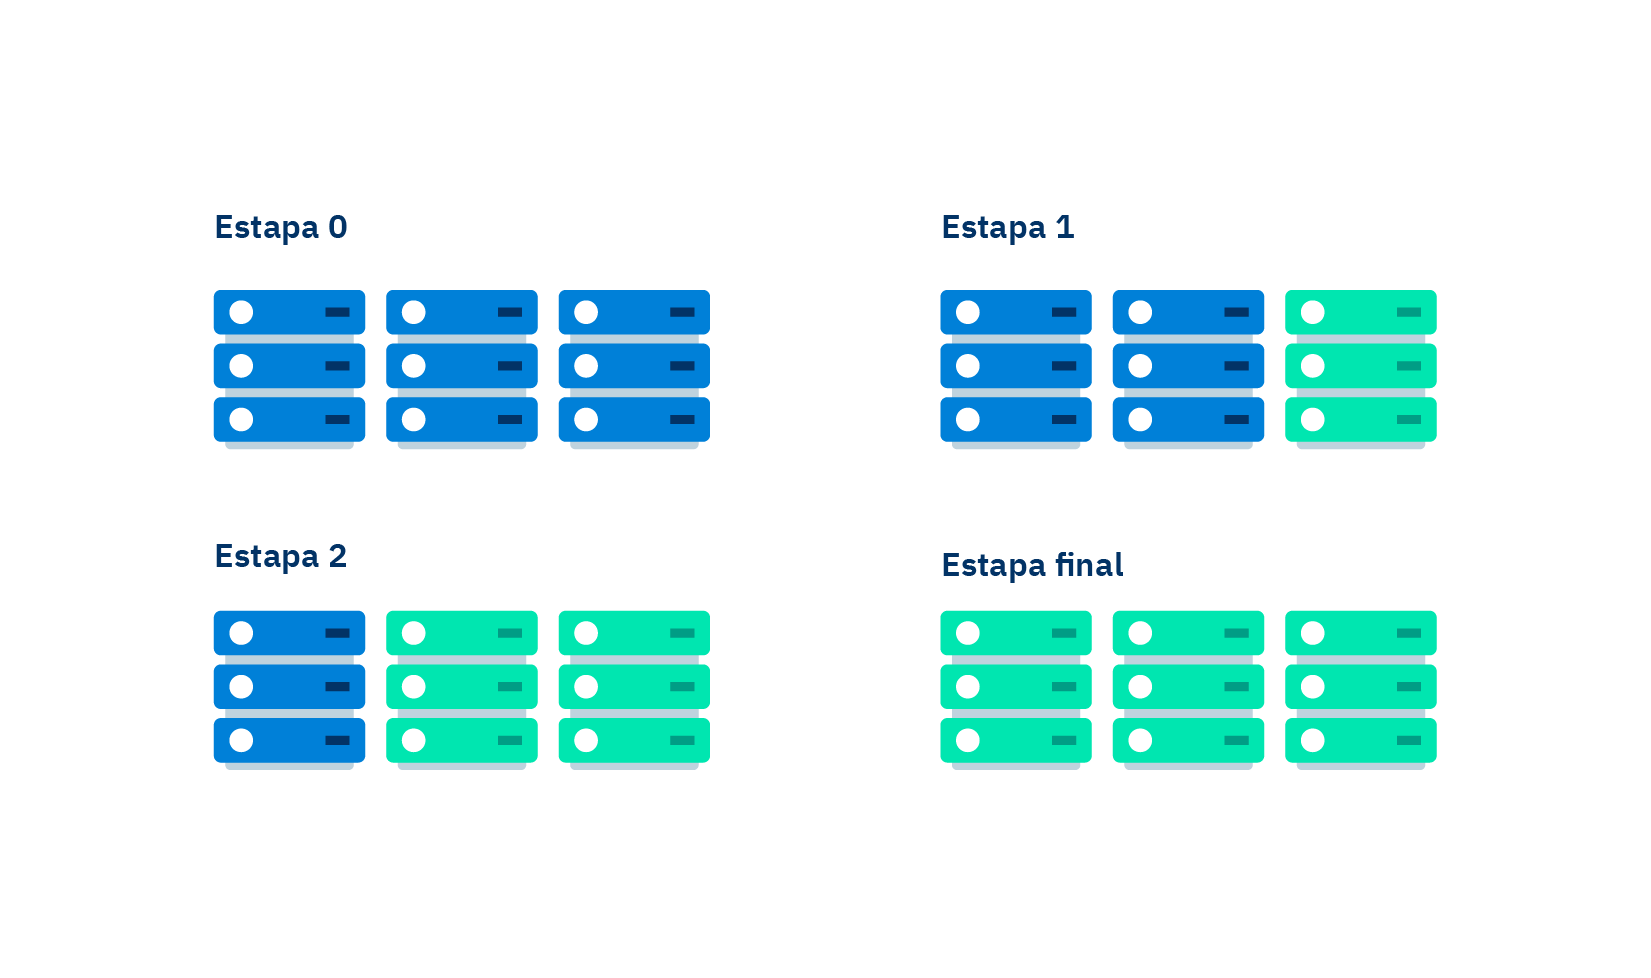
Canary deployments introduce a new version of a developed code and release it for a small part of the users, gradually increasing the number of users with access to it within a specific time frame. For example, you can launch a 10percentEveryMinute deployment, which means that at the first minute of deploying the code to production only 10% of the users will be using it, while the remaining 90% will continue accessing the old code. The usage percentage of the new code will be gradually increased until total deployment has been achieved.

A gradual deployment may be accompanied by automated monitoring alarms that detect the error level of the code that is being tested, if it is higher than the threshold, an automatic rollback will be performed. A rollback is understood as aborting the new deployment to production, a functionality that is generally used when errors were found in the new code.

Likewise, you can complement alarm monitoring by running functions before and after starting the deployment, in order to ensure that the code being tested does not cause any problems. The idea is running a test system using the old code we know is working in the first stage, and then repeat the test using the new code. This allows us to prevent a random deployment that unluckily has hidden any potential bugs during deployment due to simple statistics.

In this way, canary deployments help us to:

  • Perform deployments to production under a controlled environment.

  • Roll back easily.

  • Version code in production.

  • Reduce bugs significantly.

As we can see, canary deployments have a lot of advantages, well-received by developers when releasing code to production. However, I want to put in perspective that if statistics are poorly read, this might cause aborted deploys due to results full of false positives from errors that actually never occurred. During deployment, some problems caused by integrated suppliers or third parties may occur, and, when error measurement is performed automatically, deployment might be also canceled automatically, taking these third parties problems as if they were ours.

This reinforces the need to establish more control mechanisms. Although they will make the process of release to production longer, they also will reduce the error rate, and we will avoid false positives.


Below you will see a practical example of a canary deployment using Serverless Framework.

You can configure a canary deployment in a very simple way by using the structure of a serverless project with the following lines of code:

A canary deployment is configured in a very simple way by using the structure of a serverless project with the following lines of code:

Step 1: Install the plugin version in the package.json file

js "serverless-plugin-canary-deployments": "0.4.8"

Step 2: Reference the plugin in the 'plugins' section of the serverless.yml file

yaml plugins: - serverless-plugin-canary-deployments

Step 3: Set up the options of the canary deployment you will use. In this example, we will specify two alarms, the environments where the canary deployment will be applied and the type of deployment.

yaml deploymentSettings: stages: - ci - qa - stg - uat - primary type: 10percentEvery1Minute alias: Live alarms: - ErrorChargesGatewayAlarm - ErrorChargesCountAlarm

Step 4: Reference the configuration of the canary deployment in the lambda function to be applied. yaml functions: record: handler: src/handler/RecordHandler.HANDLER${self:custom.deploymentSettings}

And that's it!


We have analyzed much of the pros and cons that we can find in a canary deployment, from the concept to a practical example of how to make it functional. Without a doubt, the use of this technique is becoming an increasing trend in the world of software development, as it minimizes errors in the critical components of a software system, allowing developers to sleep peacefully at night.

Be the life of the party with the latest information on digital payments.

Subscribe to our Kushki Hub to receive alerts about our new content.

Suscribe illustration
Don't know which product is right for your business?
Does the world of payments catch your attention?

More about our kushki Hub

Powering the Development of the Real Estate Sector with MobySuite

Driving the development of the real estate industry with MobySuite Digital media have set an important milestone in the commercialization of goods and services, and the real estate sector is not an exception. Digital platforms already were the preferred means for the purchase and rent of properties. Then, the COVID-19 pandemic forced us to confinement, increasing the need of businesses to adopt new technologies and transform themselves digitally. Given this need, PropTech (property technology) enterprises keep finding the best way to apply technology to the refinement, improvement and reinventing of the real estate sector. One of these companies is MobySuite, which, with its real estate software 100% online, supports the property purchase process from the first contact by the potential owner to the time of handing over the property. They provide assistance in customer service (in-person and remotely) and also in the reservation and payment management process. In this way, Mobysuite improves the experience of property purchase and selling by providing help and opening possibilities for all the stakeholders involved in the process: For buyers, to make the payment of their installments remotely. For real estate agencies, to automate their business flow and keep it updated in real time. For customers (property owners), to make reservation agreements for property, to pay reservations (with Visa and Mastercard), and download agreements in an easy and automated way. Among other things. The role we play in LatAm development Our commitment to promoting the development of the LatAm economy is what keep us together. In the end, we all want to generate the necessary transformation in the financial and real estate market, working with passion and developing the cutting-edge technologies adapted to the needs of customers and users. Together we offer a solution for real estate agencies so that they can manage their processes safely, efficiently and intuitively. Making possible on their part, the access and payment of real estate services for customers who need them, thus keeping the economy of these countries in motion.
Avatar img
Stella Vargas
Líder de contenido @Kushki
agosto 25, 2020

Create your first GraphQL API using AWS AppSync

We have a lot to share about this topic. So if you want to learn, read carefully. First, you want to know that the information will be divided in two parts: In this article, we will address basic concepts of GraphQL. We will design a simple API from scratch, and we will deploy it using AWS AppSync and Serverless Framework. In the second part, we will create a client-side application to consume the API. We will use Amplify+React JS framework, and we will fit our API with more features by using subscriptions for a case of real-time use. What is GraphQL? GraphQL is a data query language for APIs, the essential idea is to make the API available through a single endpoint, instead of accessing several endpoints, as it is currently done with REST. Among the advantages of GraphQL we can list the following: Customers can specify exactly the structure of the data that will be served. Efficiency in data loading, improving bandwidth use. Declarative and self-documenting style, thanks to its strongly typed schemas. Schemas Schemas determine APIs capacity and define three basic operations: query, mutation, subscription. It also includes entry parameters and possible responses. Resolvers Resolvers implement APIs and describe the server's behavior. They are basically functions that are in charge of obtaining data for each field defined in the schema. AWS Appsync + Serverless Framework AppSync is a serverless service managed by AWS; it is GraphQL layer that will help us to develop our API smoothly. It is important to know AppSync basic components: Schema: As we said before, it will help us to define basic types and operations to retrieve and save data. Resolvers: They define query mapping templates and response templates for each field defined in the schema. They are written in VTL and are responsible for interpreting the responses from data sources; they also analyze queries. Data sources: Integration with AWS services: DynamoDB, Lambda, RDS, and ElasticSearch. Authentication: We can authenticate APIs by using API keys, IAM or Cognito User Pools As we can see, AppSync provides some tools to build a GraphQL API smoothly. We just follow a series of steps in the AWS AppSync console and, in a few minutes, we will have a functional app. However, we prefer to do it in a way that keeps it closest to the reality of modern production applications. Here's where Serverless Framework comes into play: A robust technology for defining infrastructure as code focused in serverless applications for different cloud providers. At Kushki, we believe that, nowadays, having a versioned and automated serverless infrastructure is crucial. We will see that it is a practical and efficient way of implementing our API. Serverless features several options to deploy AppSync in the cloud. Let's start to put into practice all these concepts by creating a simple application. The application: To-do List In this first part of the article, we will create a GraphQL API of a CRUD To-Do List. We will use DynamoDB for the database. Requirements: NodeJS An account in AWS (set up credentials) Serverless Framework Let's start installing Serverless Framework and a plugin for Appsync: npm install -g serverless serverless-appsync-plugin In the main directory of the project, we will execute the following command to create a template containing the configurations we need to create a serverless application in AWS. serverless create --template aws-nodejs Note: Add serverless-appsync-plugin in the plugins section of the serverless.yml file: First, we'll define part of our infrastructure. To do this, we will create an all table in DynamoDB, in serverless.yml. At this moment, we will not worry about multiple configurations, the following fragment of code will be enough: yml resources: Resources: all: Type:"AWS::DynamoDB::Table" Properties: TableName: all AttributeDefinitions: - AttributeName: id AttributeType: S KeySchema: - AttributeName: id KeyType: id KeyType: HASH BillingMode: PAY_PER_REQUEST Define a GraphQL Schema In the root file, create a schema.graphql file. Here is where we will define our schema and data types. For the moment, we will define the query and mutation operations. GraphQL has its own syntax, called SDL, here you can learn more about this topic. query: Query mutation: Mutation } type Query { listToDos: [ToDo] getToDoById(id: ID!): ToDo } type Mutation { createToDo(input: CreateToDoInput!): ToDo updateToDo(input: UpdateToDoInput!): ToDo deleteToDo(id: ID!): Boolean } type ToDo { id: ID! name: String title: String! description: String completed: Boolean! } input CreateToDoInput { id: ID! name: String! title: String! description: String! completed: Boolean! } input UpdateToDoInput { name: String! title: String! description: String! completed: Boolean! } ``` Remember that for each field you define, you need to implement a resolver. In this case, our resolvers are queries for DynamoDB, written in VTL. There are some utility functions that will make its implementation easier, for more information on resolver mapping templates, you may [check this link.](https://docs.aws.amazon.com/es_es/appsync/latest/devguide/resolver-mapping-template-reference-overview.html) ### createToDo Resolver: We will create a mapping-templates directory in the root file of the project where we are hosting **the query and response resolvers** for each field created in the schema. **Request**: Create a createToDo-request.vtl file and insert the following code: json { "version" : "2017-02-28", "operation" : "PutItem", "key" : { "id" : $util.dynamodb.toDynamoDBJson($context.arguments.input.id) }, "attributeValues" : { "name" : $util.dynamodb.toDynamoDBJson($context.arguments.input.name), "title" : $util.dynamodb.toDynamoDBJson($context.arguments.input.title), "description" : $util.dynamodb.toDynamoDBJson($context.arguments.input.description), "completed" : $util.dynamodb.toDynamoDBJson($context.arguments.input.completed) } } Using the variable $context.argument we can have access to the entry parameters that we have defined in our schema. **Response:** Create a createToDo-response.vtl file and insert the following code: json $utils.toJson($context.result) Do not worry about how data are obtained from DynamoDB, AppSync performs the connection with data sources, returns data in the variables $context.result and $utils.toJson, and displays them in an readable format for GraphQL. If you want to process these data in the resolver, you can do it using VTL. ### updateToDo Resolver: **Request:** Create an updateToDo-request.vtl file and insert the code below; in this case, we will use an UpdateItem operation of DynamoDB: json { "version" : "2017-02-28", "operation" : "UpdateItem", "key" : { "id" : $util.dynamodb.toDynamoDBJson($context.arguments.input.id) }, "update" : { "expression" : "SET name = :name, title = :title, description = :description, completed = :completed", "expressionValues": { ":author" : $util.dynamodb.toDynamoDBJson($context.arguments.input.name), ":title" : $util.dynamodb.toDynamoDBJson($context.arguments.input.title), ":content" : $util.dynamodb.toDynamoDBJson($context.arguments.input.description), ":url" : $util.dynamodb.toDynamoDBJson($context.arguments.input.completed) } } } **Response:** Create a createToDo-response.vtl file and insert the following code: json $utils.toJson($context.result) ### getToDoByID Resolver: **Request:** Create a createToDoById-request.vtl file and insert the following code: json { "version" : "2017-02-28", "operation" : "GetItem", "key" : { "id" : $util.dynamodb.toDynamoDBJson($context.args.id) } } **Response:** Create a getToDoById-response.vtl file and insert the following code: json $utils.toJson($context.result) We will define our AppSync infrastructure and the servereless.yml file, where we will define the resolvers (mappingTemplates), schema (schema), data source, and authentication type (authenticationType). It should have the following structure: ```yml service: name: appsync-todo-app-backend plugins: - serverless-appsync-plugin custom: appSync: name: todo-app authenticationType: API\_KEY mappingTemplates: - dataSource: all type: Mutation field: createToDo request: "createToDo-request.vtl" response: "createToDo-response.vtl" - dataSource: all type: Mutation field: updateToDo request: "updateToDo-request.vtl" response: "updateToDo-response.vtl" - dataSource: all type: Query field: getToDoById request: "getToDoById-request.vtl" response: "getToDoById-response.vtl" schema: # defaults schema.graphql dataSources: - type: AMAZON\_DYNAMODB name: all description: 'All table' config: tableName: all provider: name: aws runtime: nodejs12.x resources: Resources: all: Type: "AWS::DynamoDB::Table" Properties: TableName: all AttributeDefinitions: - AttributeName: id AttributeType: S KeySchema: - AttributeName: id KeyType: HASH BillingMode: PAY\_PER\_REQUEST ``` Finally, we will execute the following command to deploy our API in the AWS cloud: serverless deploy Testing our GraphQL API: ------------------------ If we open AWS AppSync console, we will see the schema, the resolvers, the authentication and the data source that we have defined. ![1](//images.ctfassets.net/51xdmtqw3t2p/38jvJWZzFIzGLXeuPAULHy/70ebd476682d5a05dd8ba70cb48839f5/1.png) On the other hand, we also have a GraphQL client that we will use to test our API. In the Figure below, we can see the API's documentation according to the schemas defined. ![2](//images.ctfassets.net/51xdmtqw3t2p/2Vc4LvOnbdPFSVrQLQxvVx/c75d14d482037f1262f9f56908cce231/2.png) When executing the createToDo **mutation operation** a registry is created in DynamoDB and returns the object created according to the defined fields. ![3](//images.ctfassets.net/51xdmtqw3t2p/2N63LoqxNDUNntXI1jyvF9/175900fec088c5ffa1b5b47f2b0278f1/3.png) ![4](//images.ctfassets.net/51xdmtqw3t2p/28XQHlO0GGHd9nfnRjuoZx/8d323149837cf818cfea1cf326678e75/4.png) To retrieve data from a ToDo, we should execute the getToDoById **query operation**. We can request the field **name** only, or those that are necessary. ![5](//images.ctfassets.net/51xdmtqw3t2p/76oayQ1SYwYAwiiwUaR2Jg/8961d007947bbde203072dc0c221dbd4/5.png) ![6](//images.ctfassets.net/51xdmtqw3t2p/4m9ABOfoYUtN0iYijubnGT/5774f1bfa0299539fc6ab49c698ff445/6.png) --- There you have: **In this article, we described GraphQL basic concepts, we designed a simple API from scratch, and deployed it using AWS AppSync and Serverless Framework.** **Remember that a second part is to come, where we will create a client-side application to consume the API. We will use Amplify+React JS framework, and we will fit our API with more features by using subscriptions for a case of real-time use.** Join us in the second part of this article!
Avatar img
Alex Suquillo
Software Developer
agosto 17, 2020
Canary Deployments and how to sleep peacefully at night